User Documentation: Meeting Assistant - Windows Version
Table of Contents
1. Product Introduction
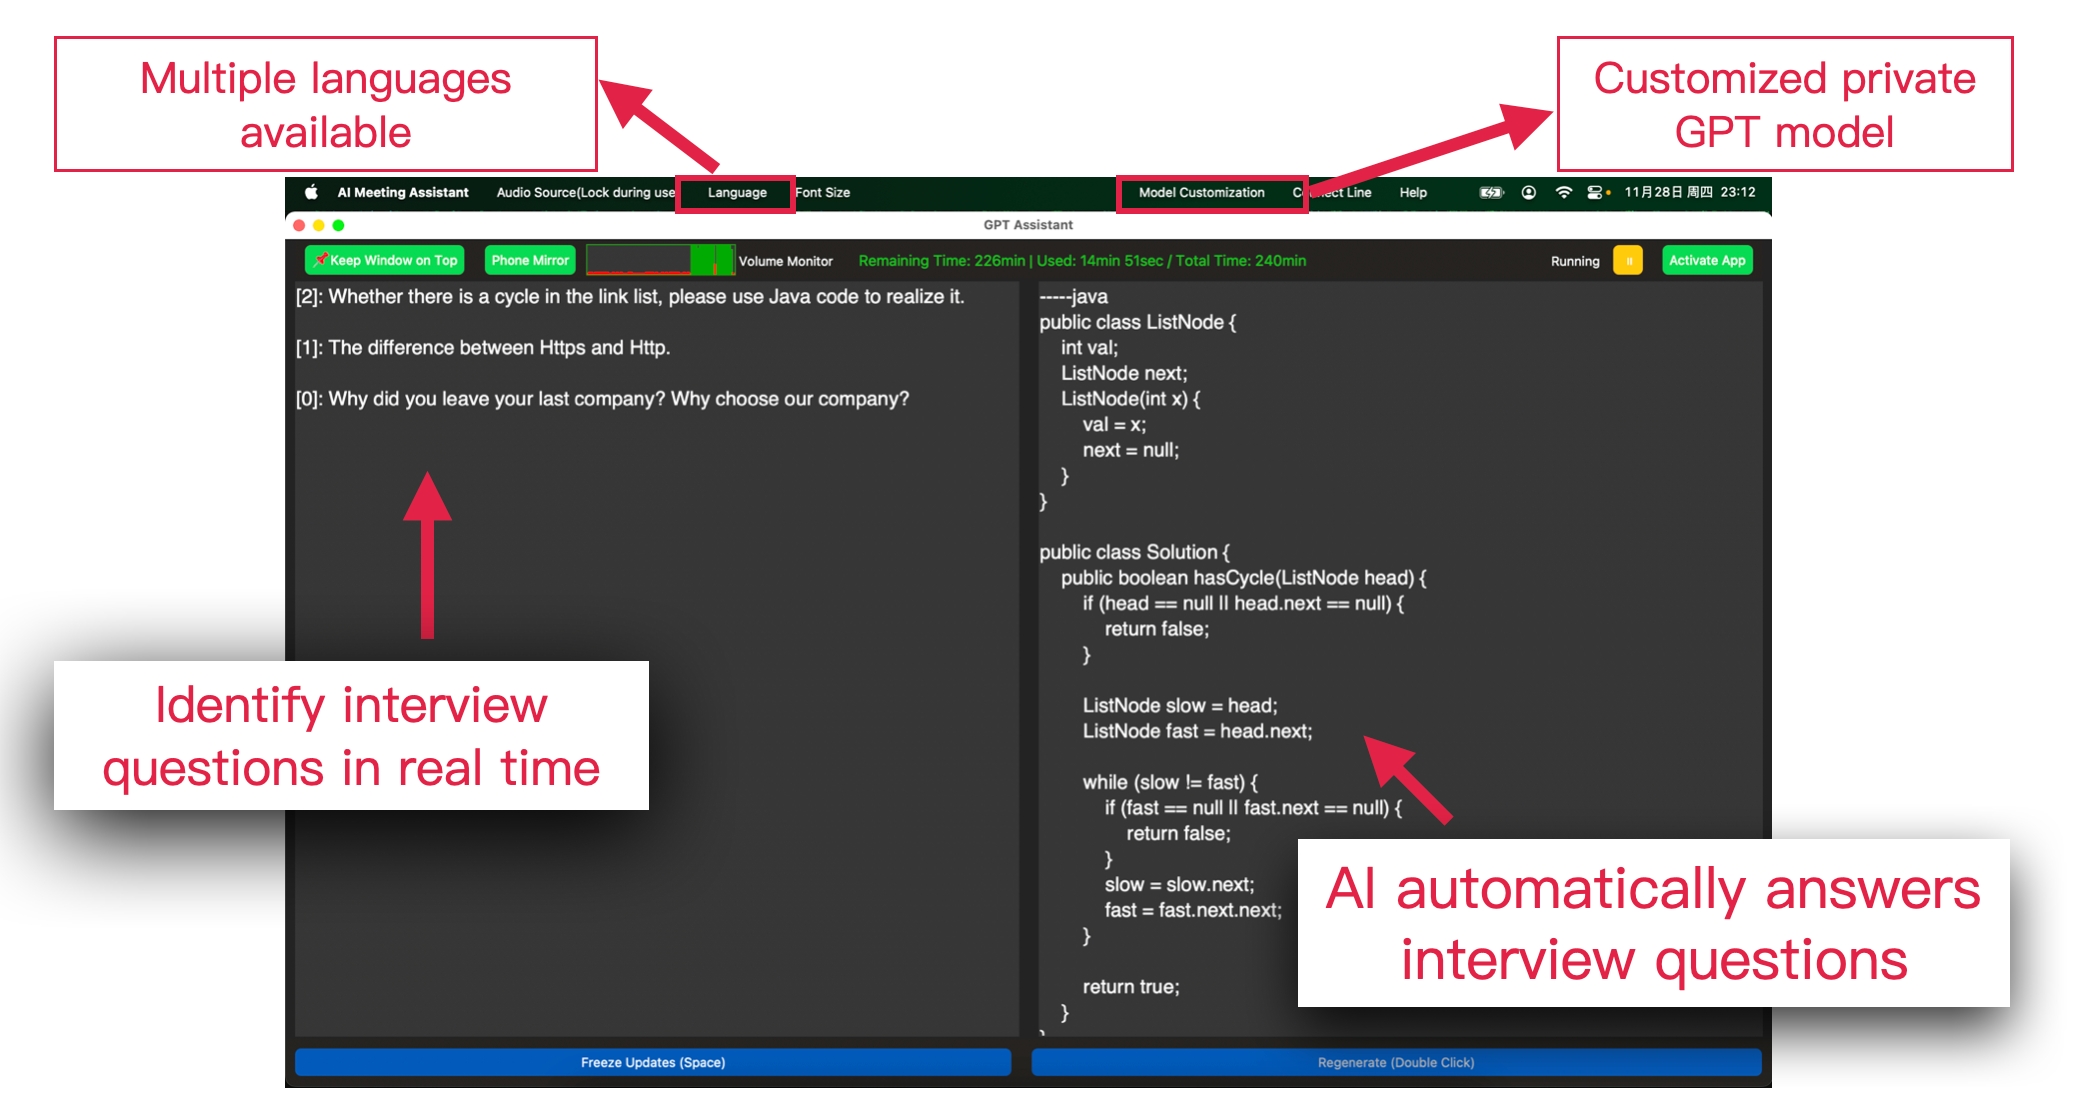
A professional occasion designed auxiliary software, real-time recognition of user microphone/speaker voice conversion to text records; and through GPT model automatically generates replies, to achieve efficient communication.
This application aims to improve the efficiency and quality of meetings through real-time voice recognition and intelligent model interaction.
Product Effect
3. Interface Tour
3.2 Main Interface Layout
3.2.1 Left Area: Real-time Voice Transcription
- Real-time Voice Display Area: Displays real-time captured voice-to-text content.
- Numeric Tags: Identifies the current sentence number before each transcribed text with "[Number]".
3.2.2 Right Area: Intelligent GPT Assistance
- Intelligent Assistance: Automatically recognizes key information in the transcribed content and generates intelligent assistance replies.
- History Playback: Provides playback of assistance replies for historical conversations, making it easy for users to accurately review the content of the discussion.
3.2.3 Bottom Area: Status Operation Bar
- Freeze/Resume Refresh Button: Freeze/resume the refresh of the conversation interface
- Re-reply Button: Regenerate the reply for the current conversation
4. Functionality Usage Guide
- In the top right corner of the application interface, you will see a prominent "Start" button. Clicking this button will initiate the application to start real-time recognition of your voice input, convert it to text, and use the GPT model to generate replies. Clicking the button again will pause the recognition function.

Start/Pause
4.2 Operation Gesture Guide
- Single-click on the historical conversation record: Click on a record in the historical conversation bar, and the corresponding historical reply will be displayed on the right. The conversation interface will enter a frozen state, pausing automatic refresh.
- Double-click on the historical conversation record: If the reply does not meet your expectations, double-click the relevant conversation record to regenerate the GPT reply. The conversation interface will enter a frozen state, pausing automatic refresh.
- Swipe down on the historical conversation: When swiping to view the conversation history, the conversation interface will enter a frozen state, pausing automatic refresh.
- Swipe up on the historical conversation to the top: When swiping to the top of the conversation history, the conversation interface will exit the frozen state, resuming automatic refresh to display the latest real-time conversations and replies.
- Click the freeze refresh button/space bar: Click the freeze refresh button, or press the space bar, and the conversation interface will enter a frozen state, pausing automatic refresh.
- Click the resume refresh button/space bar: Click the resume refresh button, or press the space bar, and the conversation interface will exit the frozen state, resuming automatic refresh to display the latest real-time conversations and replies.
- Click the re-reply button: In the frozen state, you can manually regenerate the GPT reply for the conversation.

Operation Gesture Guide
4.3.1.1 Microphone Access Authorization
When you enable the microphone as a voice input device and the speaker is in an external playback state, the microphone may capture both the sound emitted by the speaker and the user's voice. Please choose the appropriate input device.
- Please ensure that you grant the application microphone permissions so that the application can capture voice normally:
Windows 11 steps to authorize applications to access the microphone are as follows:
Open Settings:
- Click the Start menu, then select Settings.
Enter Privacy Settings:
- In the Settings menu, select the "Privacy & Security" option.
Authorize Applications to Access the Microphone:
- Select the "Microphone" option, and on the right-hand side, you can see the switch for "Allow apps to access your microphone". Ensure this switch is turned on.
- Under the "Choose which apps can access your microphone" section, find this application and turn on the switch next to it to allow it to access your microphone.
- If you do not find this application under "Choose which apps can access your microphone", then turn on "Allow desktop apps to access microphone".
- Close and restart the application
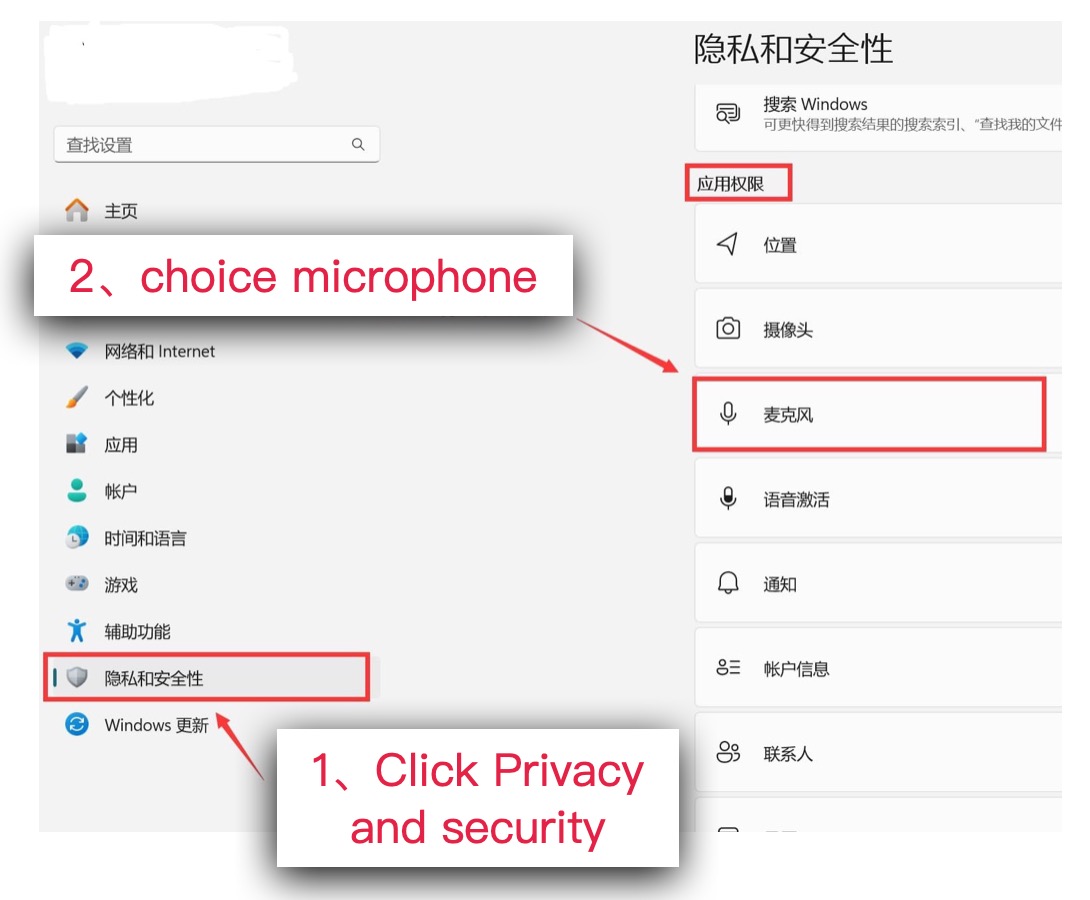
Windows 11 Step 1: Enter Privacy Settings
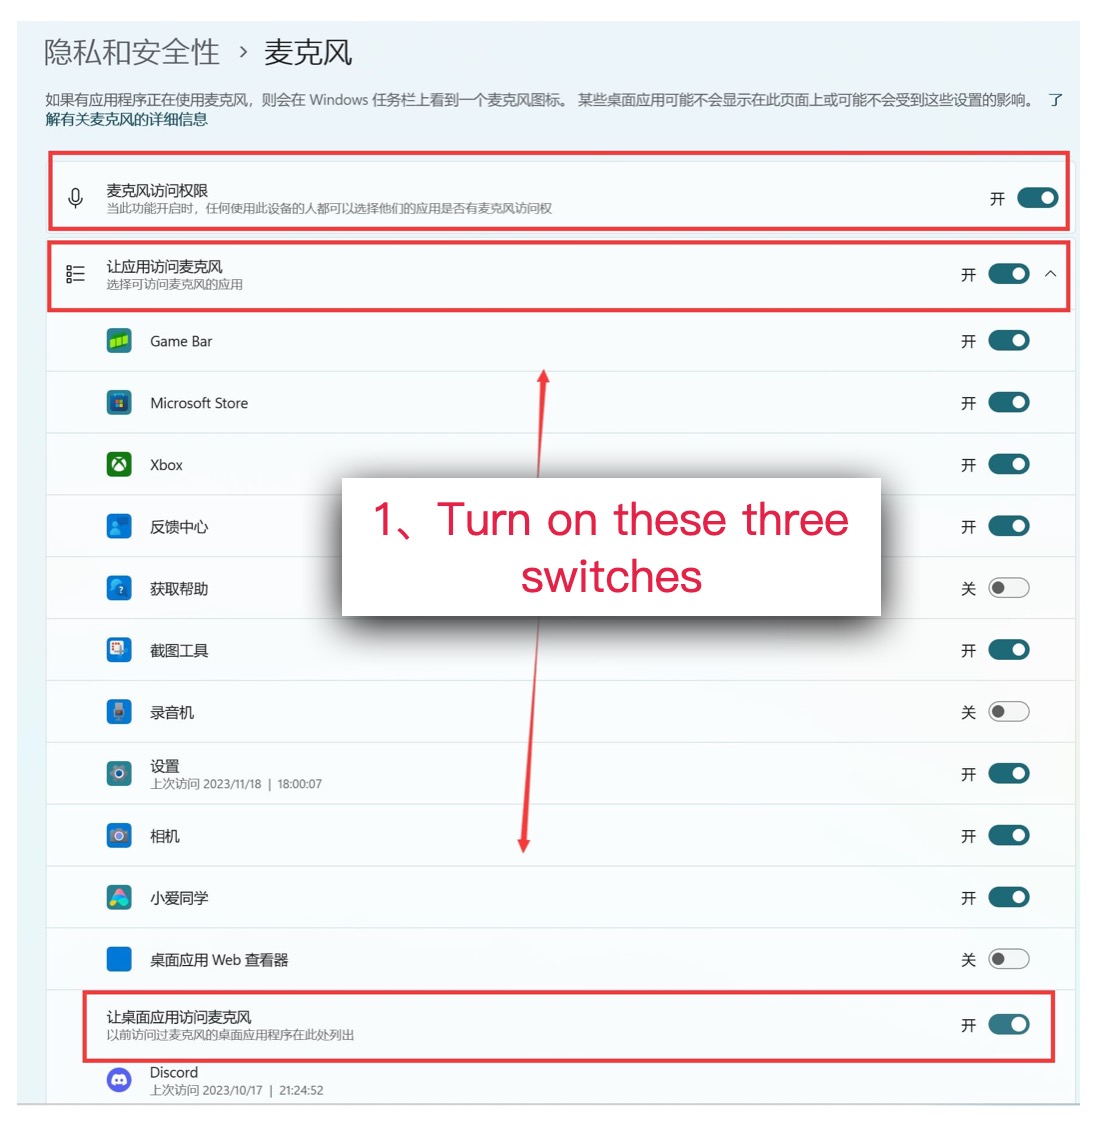
Windows 11 Step 2: Authorize Applications to Access the Microphone
Windows 10 steps to authorize applications to access the microphone are as follows:
Open Settings:
- Click the Start menu, then select Settings.
Enter Privacy Settings:
- In the Settings menu, select the "Privacy" option.
Authorize Applications to Access the Microphone:
- Select the "Microphone" option, and on the right-hand side, you can see the switch for "Allow apps to access your microphone". Ensure this switch is turned on.
- Under the "Choose which apps can access your microphone" section, find this application and turn on the switch next to it to allow it to access your microphone.
- If you do not find this application under "Choose which apps can access your microphone", then turn on "Allow desktop apps to access microphone".
- Close and restart the application
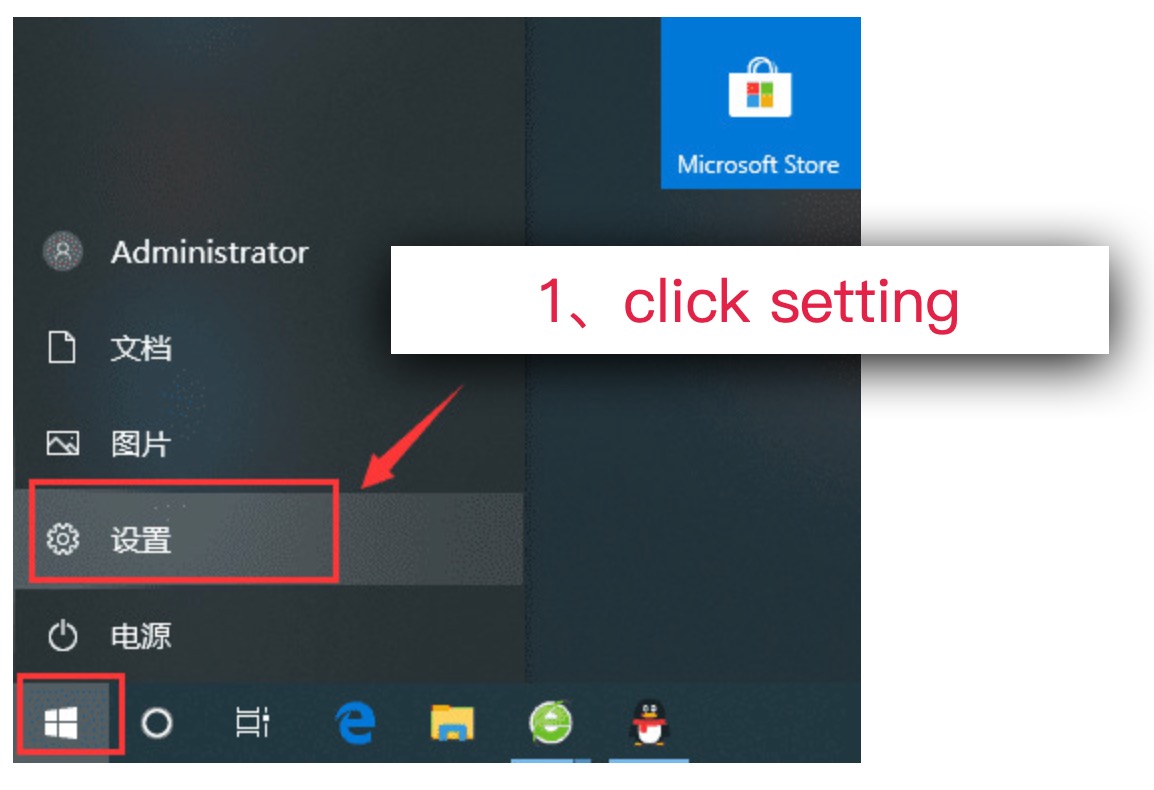
Windows 10 Step 1: Enter Settings
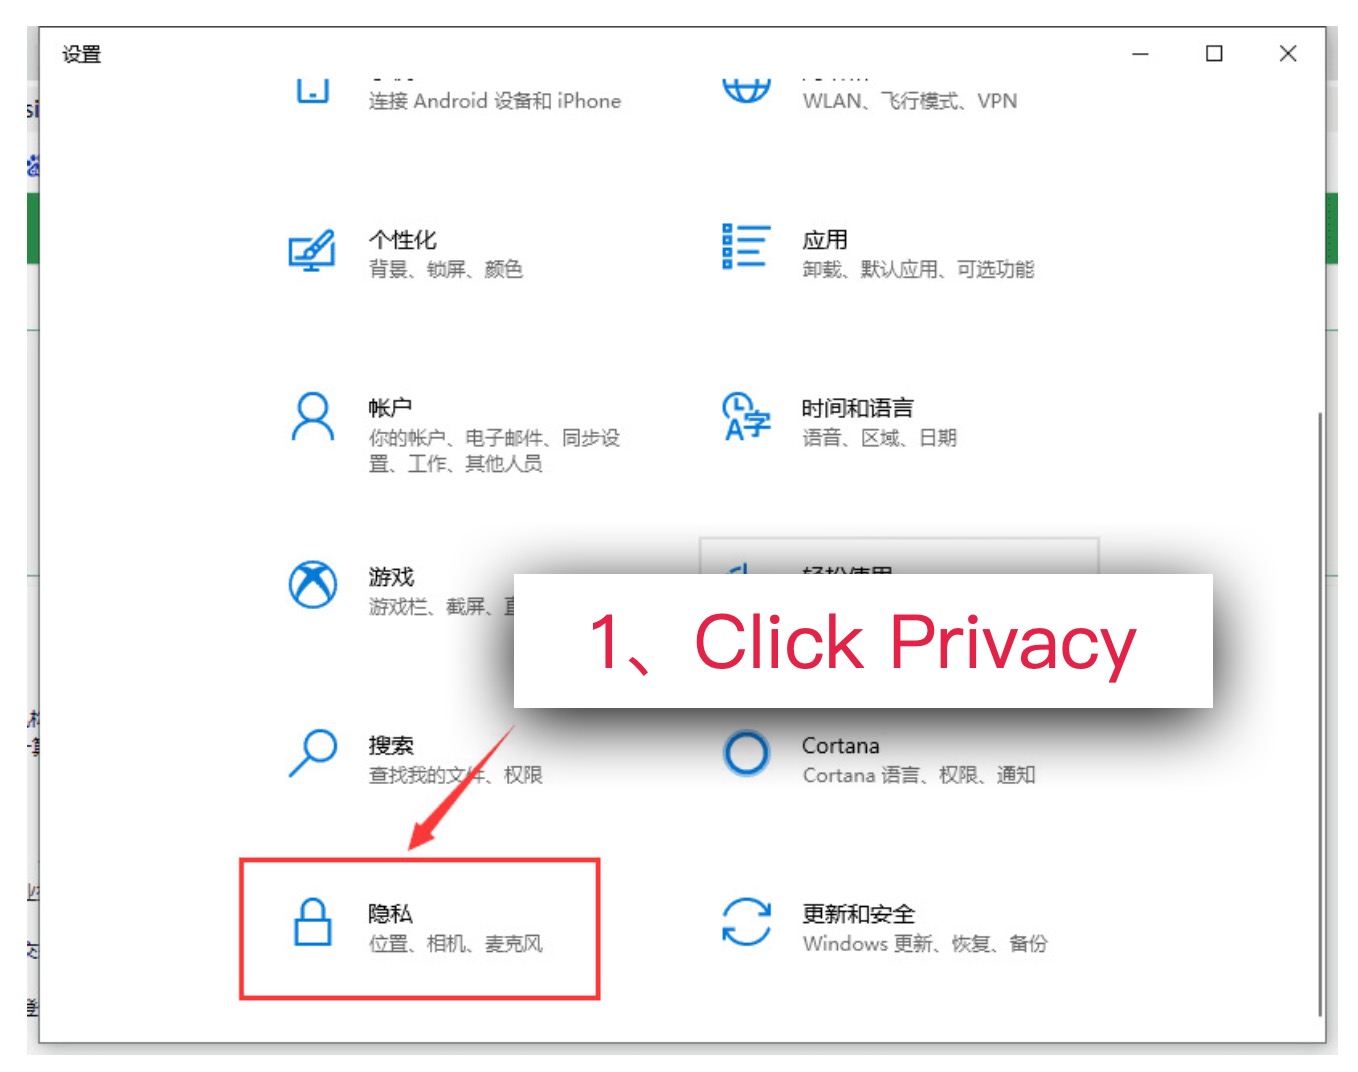
Windows 10 Step 2: Enter Privacy Settings
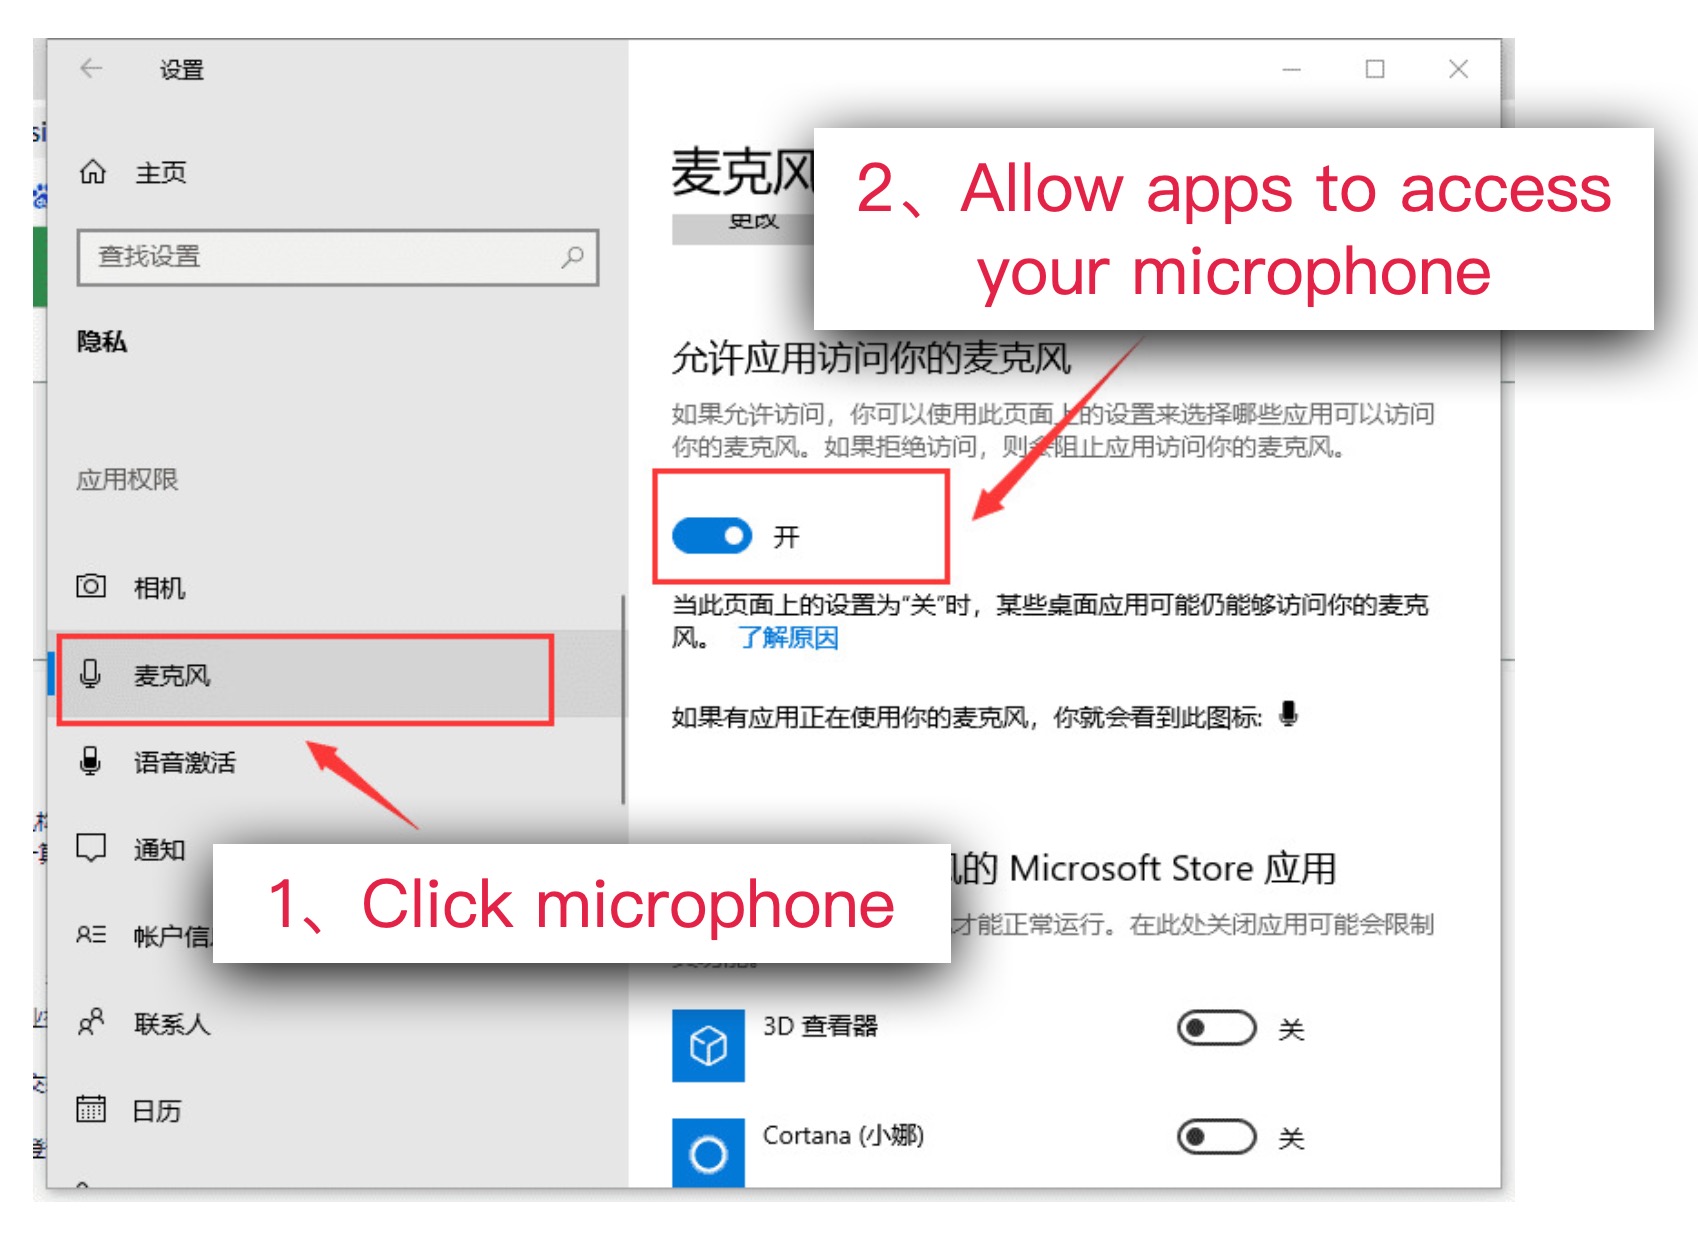
Windows 10 Step 3: Authorize Applications to Access the Microphone
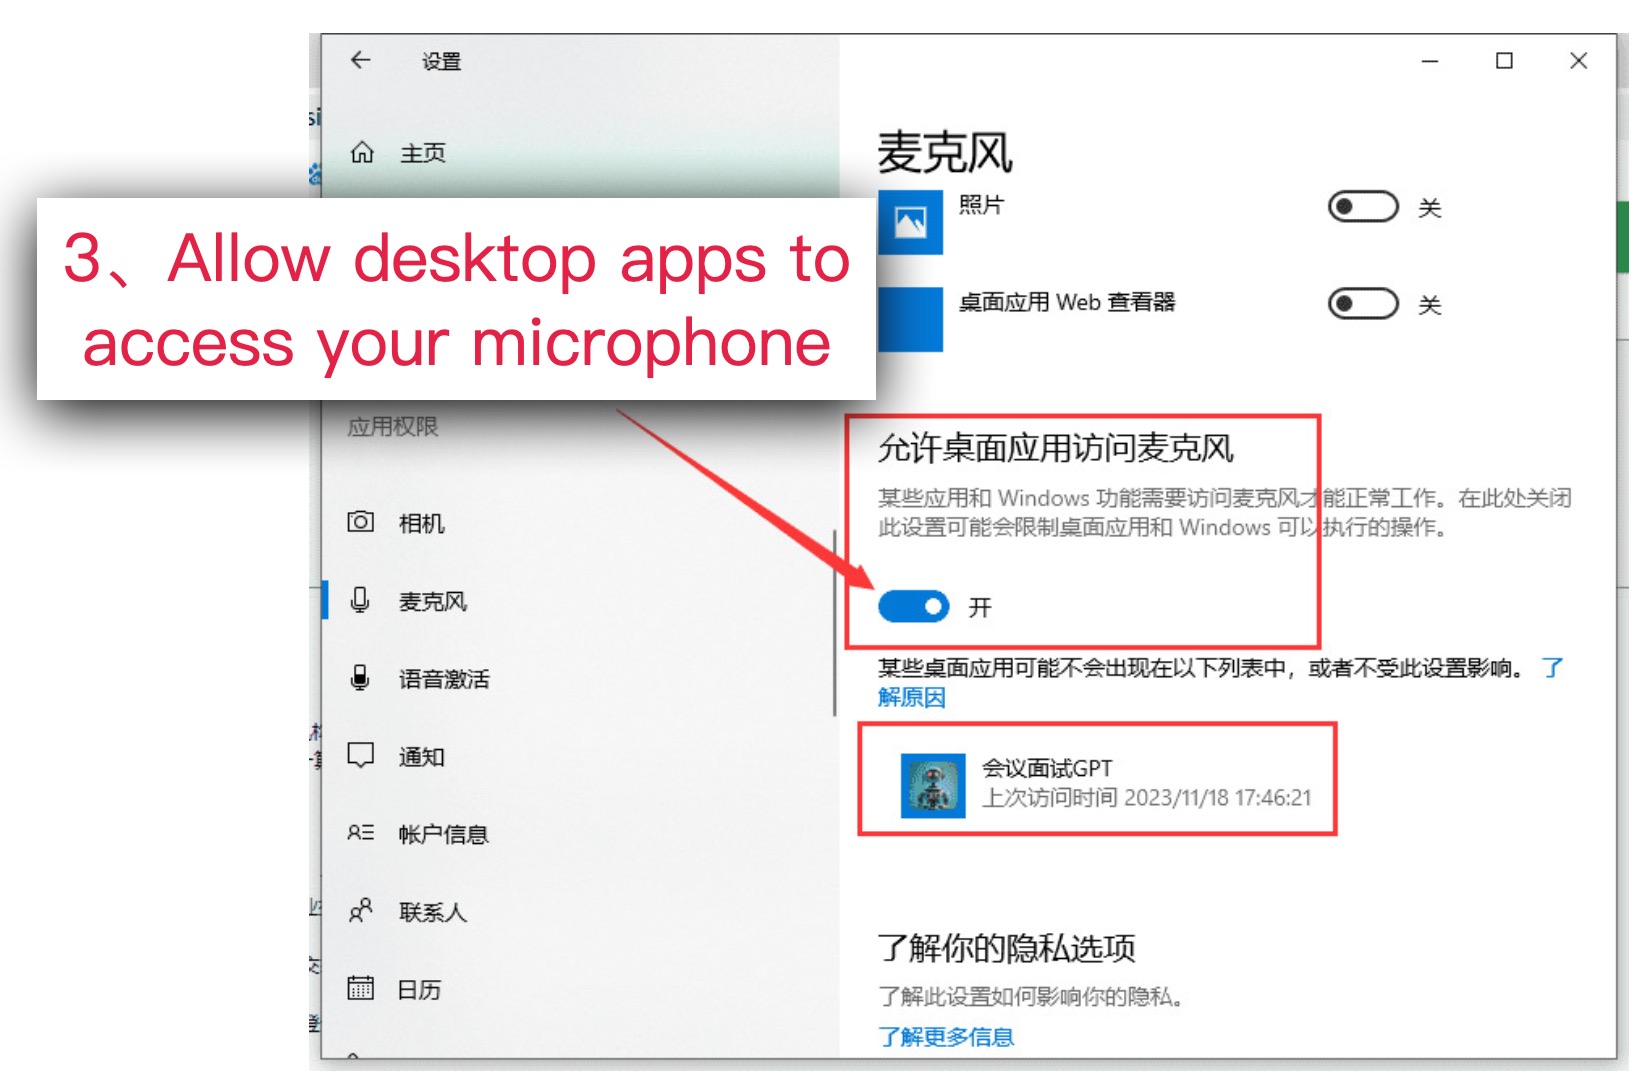
Windows 10 Step 4: Allow Desktop Apps to Access the Microphone
4.3.1.2 Microphone Voice Recognition Anomalies
If you encounter inaccurate microphone voice recognition, missing words or sentences, or interruptions, it is recommended to check from the following four aspects:
- Observe the volume detection in the figure below, whether the volume has reached the maximum
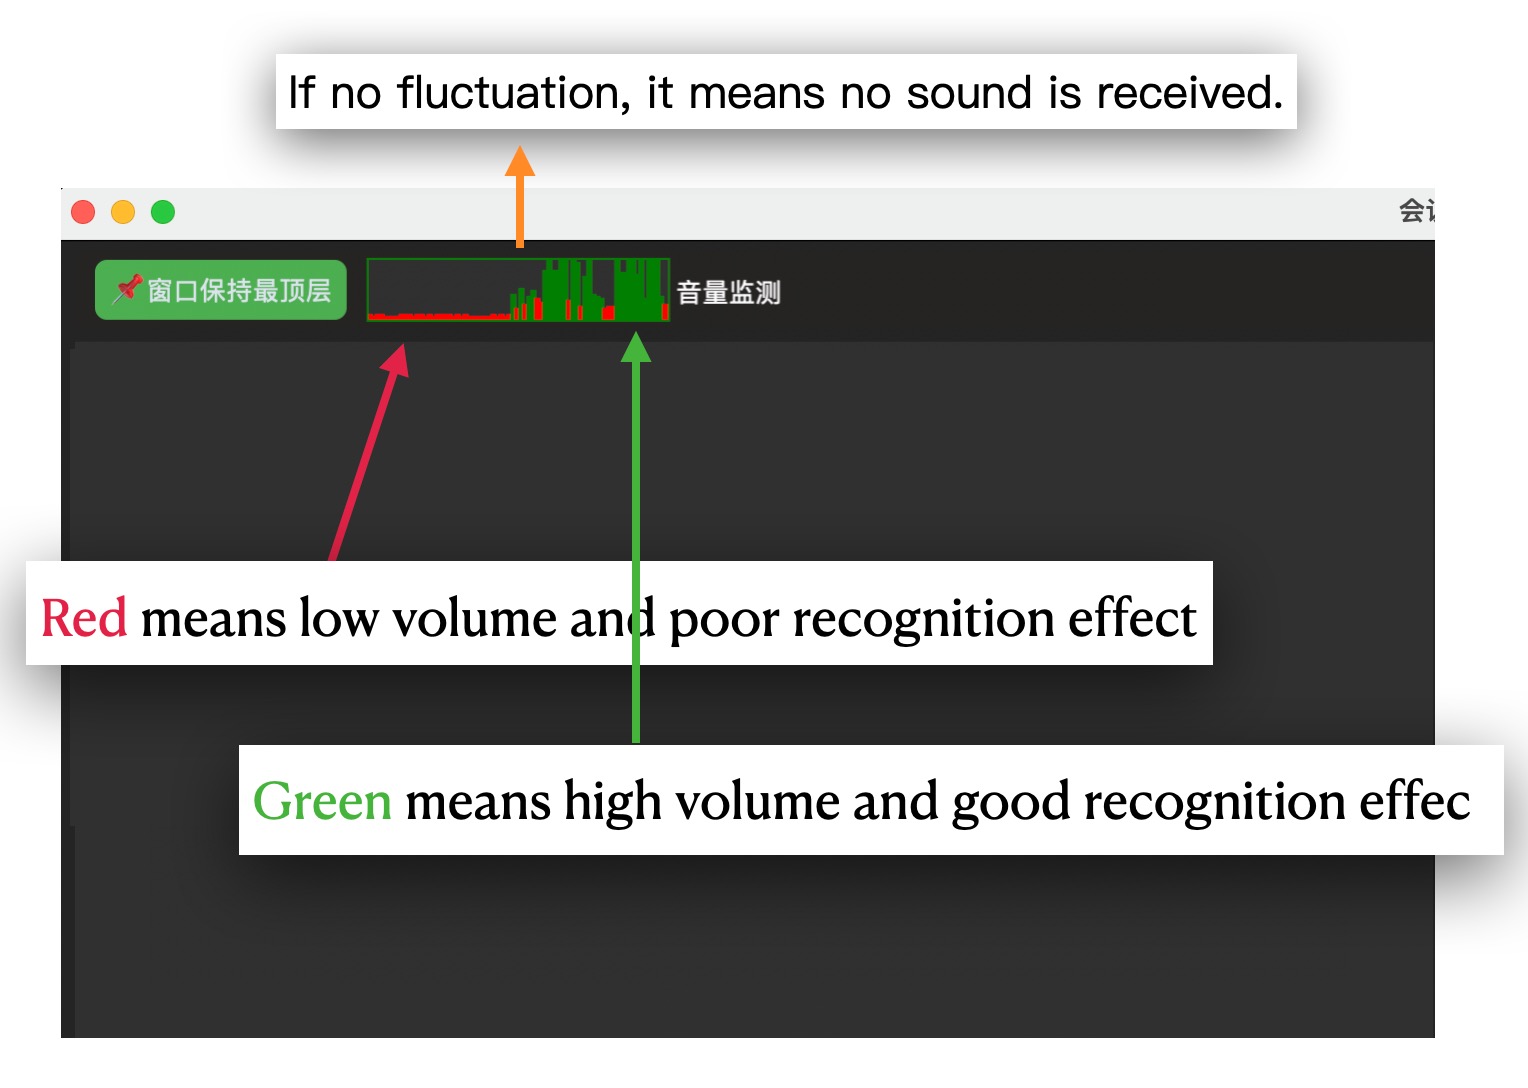
Observe whether the volume size meets expectations
- If the volume does not reach the maximum, it is recommended to refer to the figure below and check and adjust the input volume of the microphone:
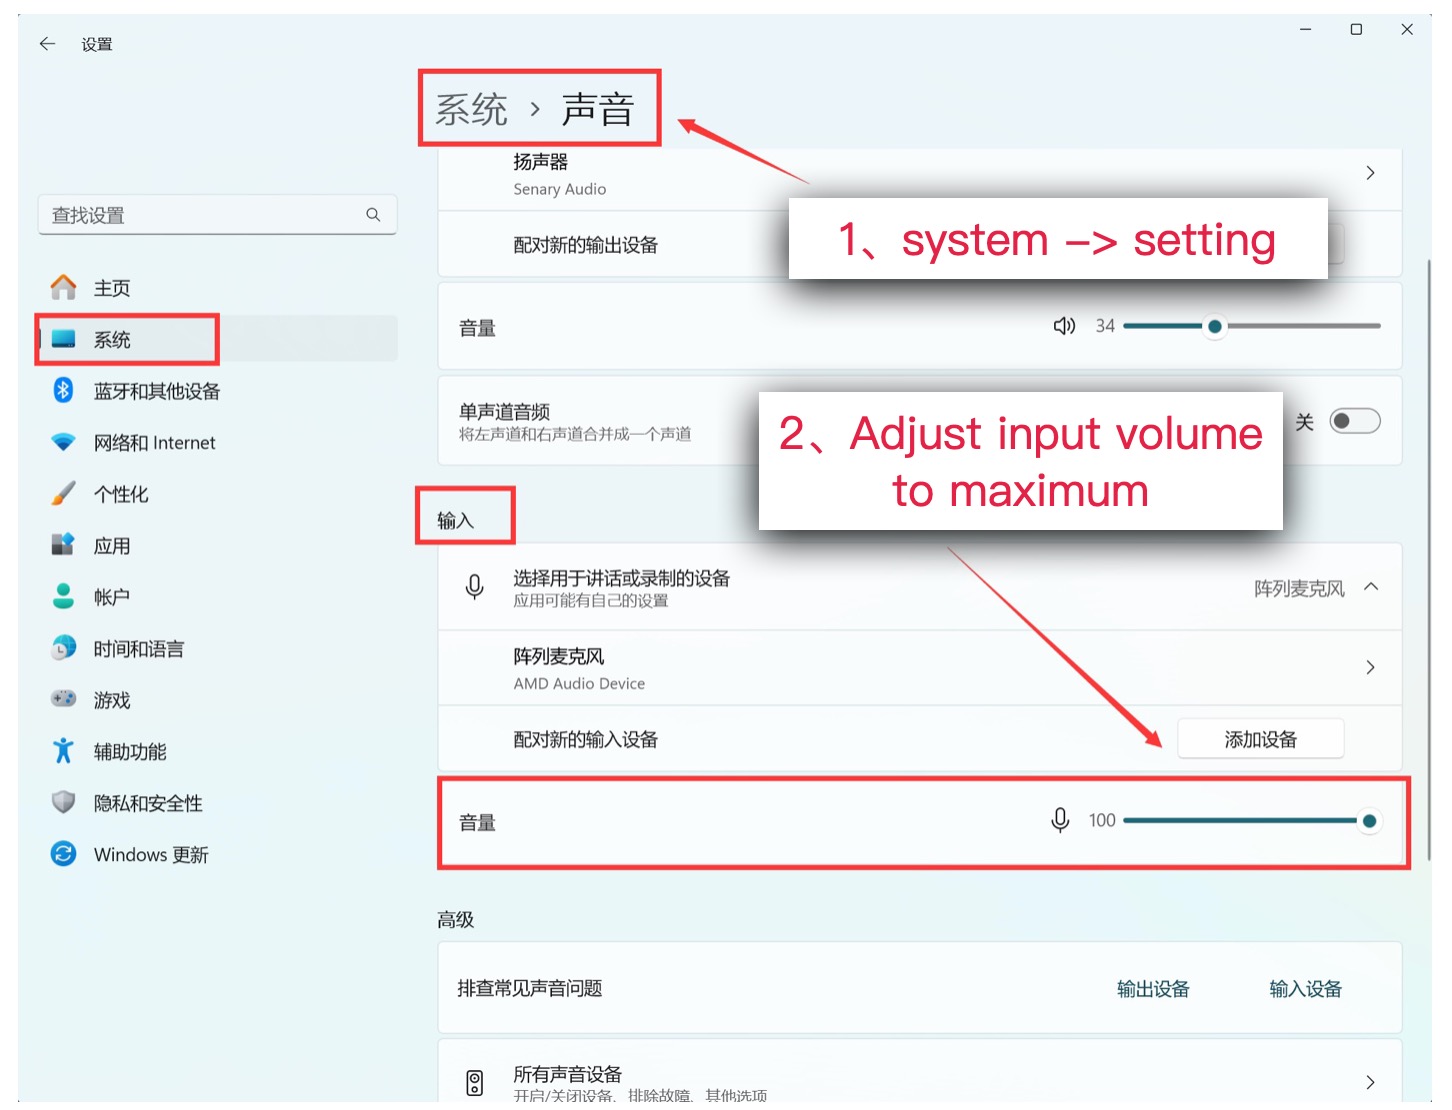
Win11 Increase Input Volume
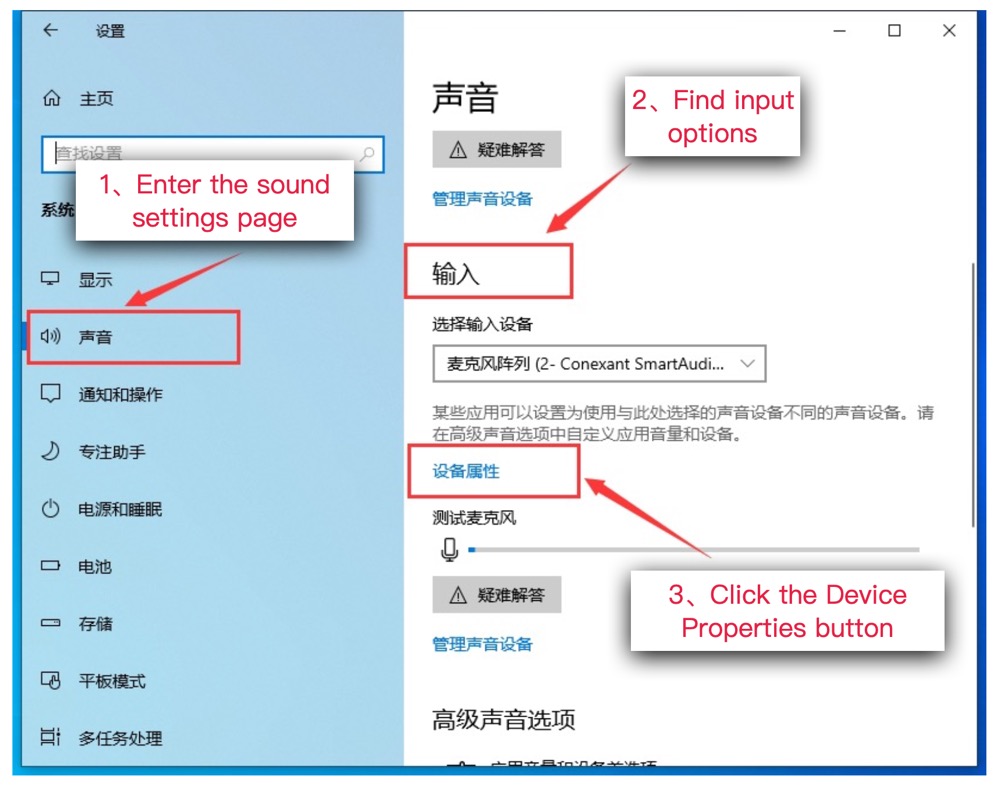
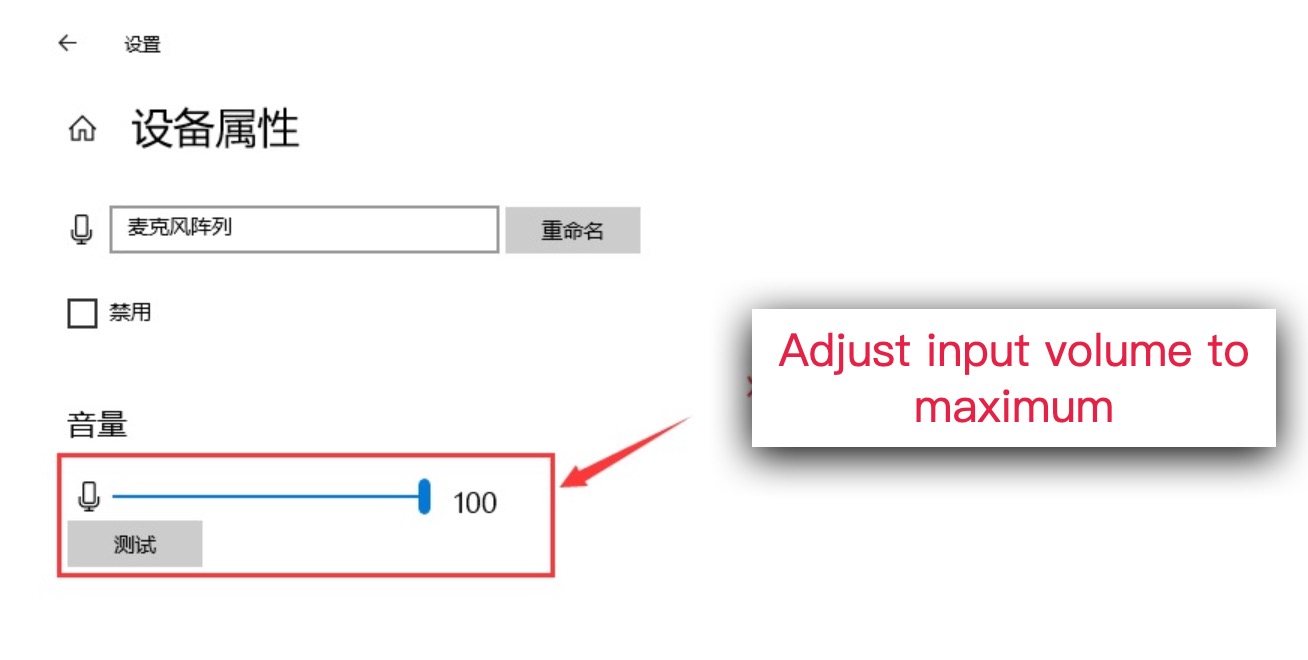
Win10 Increase Input Volume
- Turn off echo cancellation and noise reduction
Echo cancellation and noise reduction features on Windows laptops are usually provided by the system's audio processing components or third-party audio driver software.
The steps to turn off are as follows:
3.1. Turn off through sound settings
- In Windows, right-click the sound icon on the taskbar and select "Sound settings".
- In the Sound settings page, scroll down to the "Input" section and click "Properties" next to the microphone device you are using.
- In the Microphone Properties window, there may be a tab for "Enhancements" or "Improve Sound Quality". If there is, click on it.
- Here, you may see options like "Echo Cancellation" or "Noise Reduction". If enabled, you can uncheck it to turn off this feature.
- Click "Apply" and then "OK" to save your changes.
3.2. Turn off through dedicated audio control software
If your laptop uses specific brand audio drivers or management software (such as Realtek Audio Console, Nahimic, Dolby Atmos, etc.), you may need to manage echo cancellation features through these applications:
- Open your audio management software. This can be found in the Start menu or accessed by right-clicking the audio icon in the notification area of the taskbar.
- Look for echo cancellation or related settings. This may be located in the "Microphone", "Advanced", or "Effects" tabs.
- Turn off or disable the echo cancellation feature.
- Save your settings.
If you cannot find the relevant settings or are unsure how to operate, you can refer to the user manual of the laptop or audio driver software, or visit the manufacturer's official support page for more help. Different devices and software may have different setting paths and options.
In formal occasions, we strongly recommend using the speaker voice input option. This option ensures that the clarity and stability of audio recognition are optimal. (Please note that this setting cannot be changed directly during application operation. To switch audio input, please pause the application first.)
Speaker Failure to Recognize Voice Issues:
- If you encounter situations where there is sound from the speaker or headphones, but the application fails to capture it successfully, you need to run the program as an administrator again, refer to the figure below:
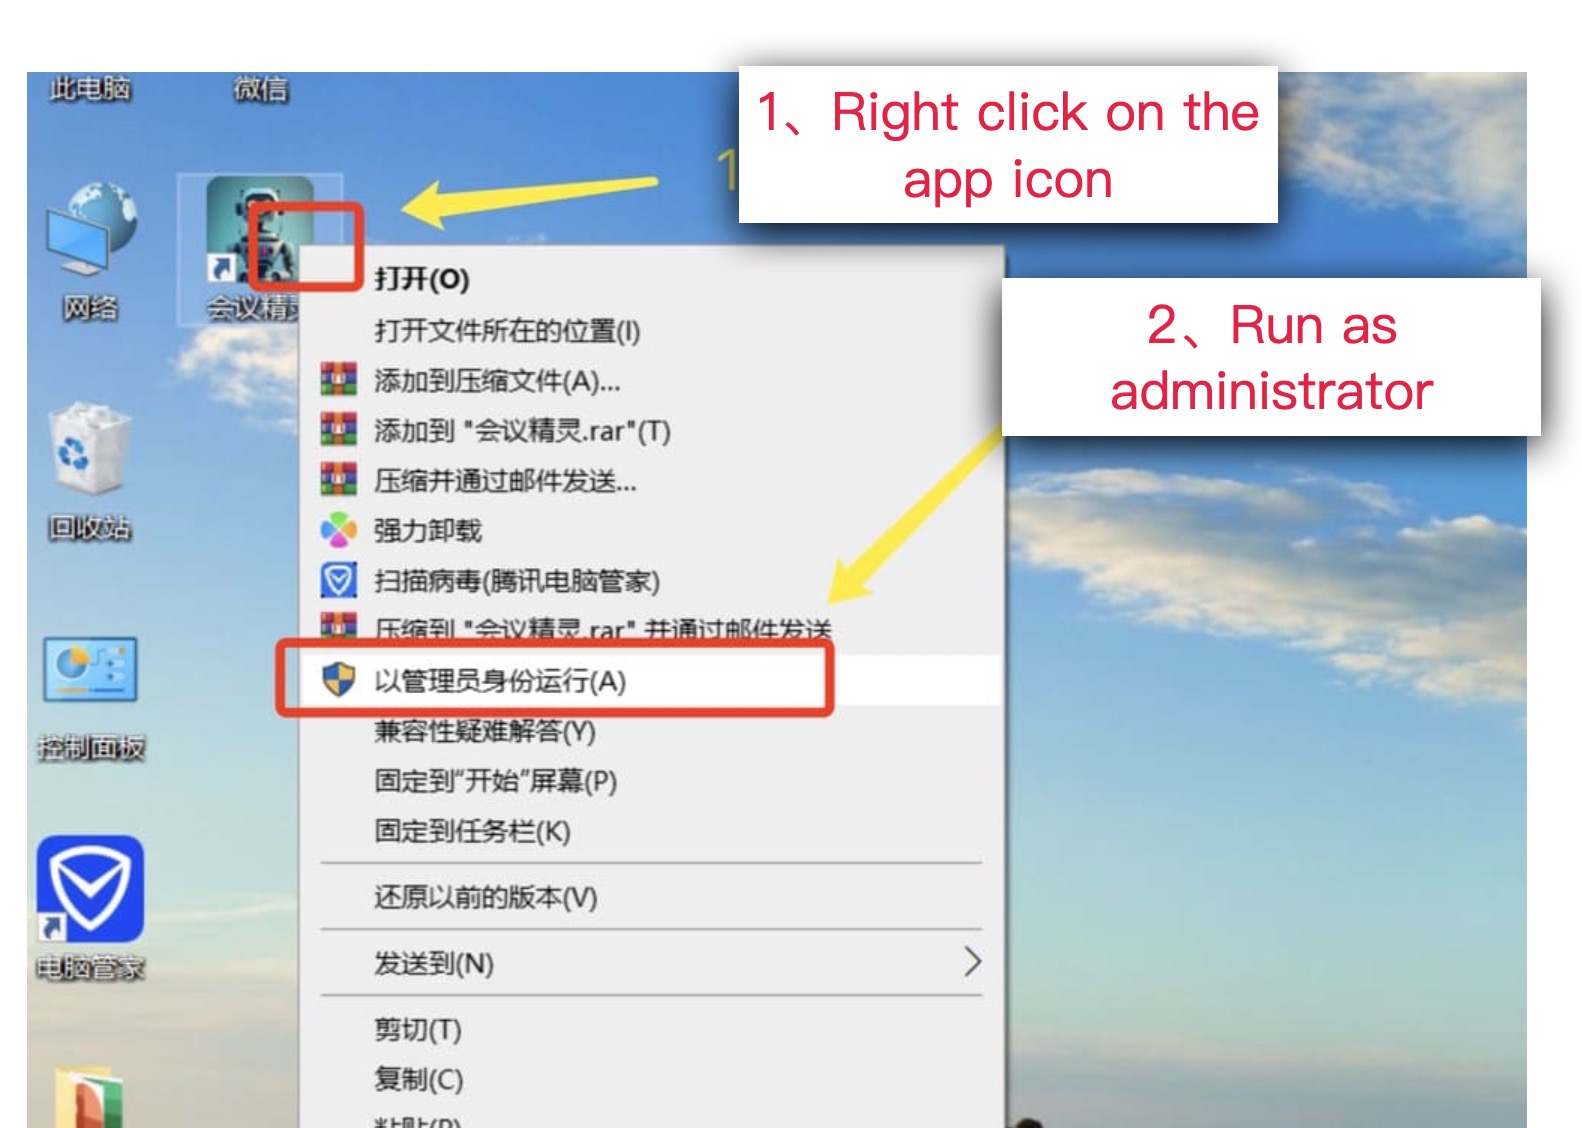
Run the program as an administrator
4.4 Mobile Remote Quick Control
Mobile remote quick control allows you to easily control this application through your mobile phone. Simply scan the QR code with your phone, open the web page, and you will see the operation interface of the desktop application on your phone, allowing you to control the application.
4.4.1 Operation Steps:
- Please first connect your phone and computer to the same WiFi network.
- Open the desktop application and click the "Mobile Control" button in the upper left corner. Use your phone to scan the QR code, open the web page, and enter the mirror control interface.
- If mobile control cannot be started, click to view the solution: Link
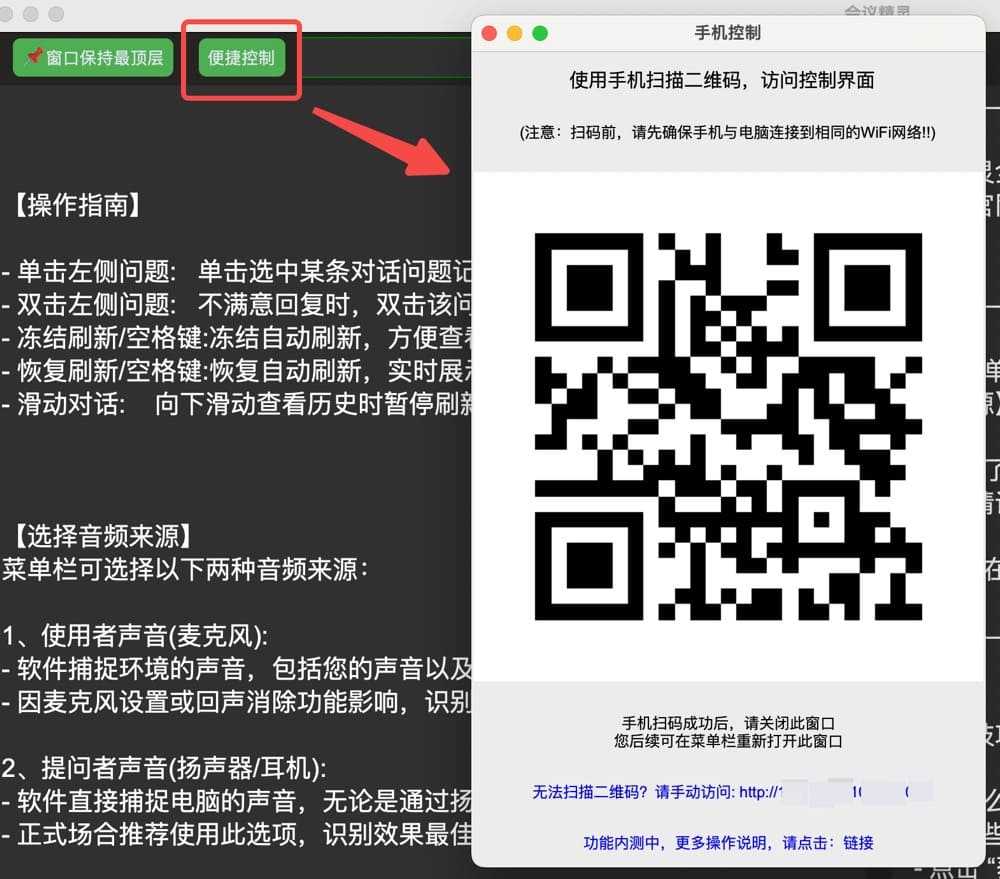
Control QR Code
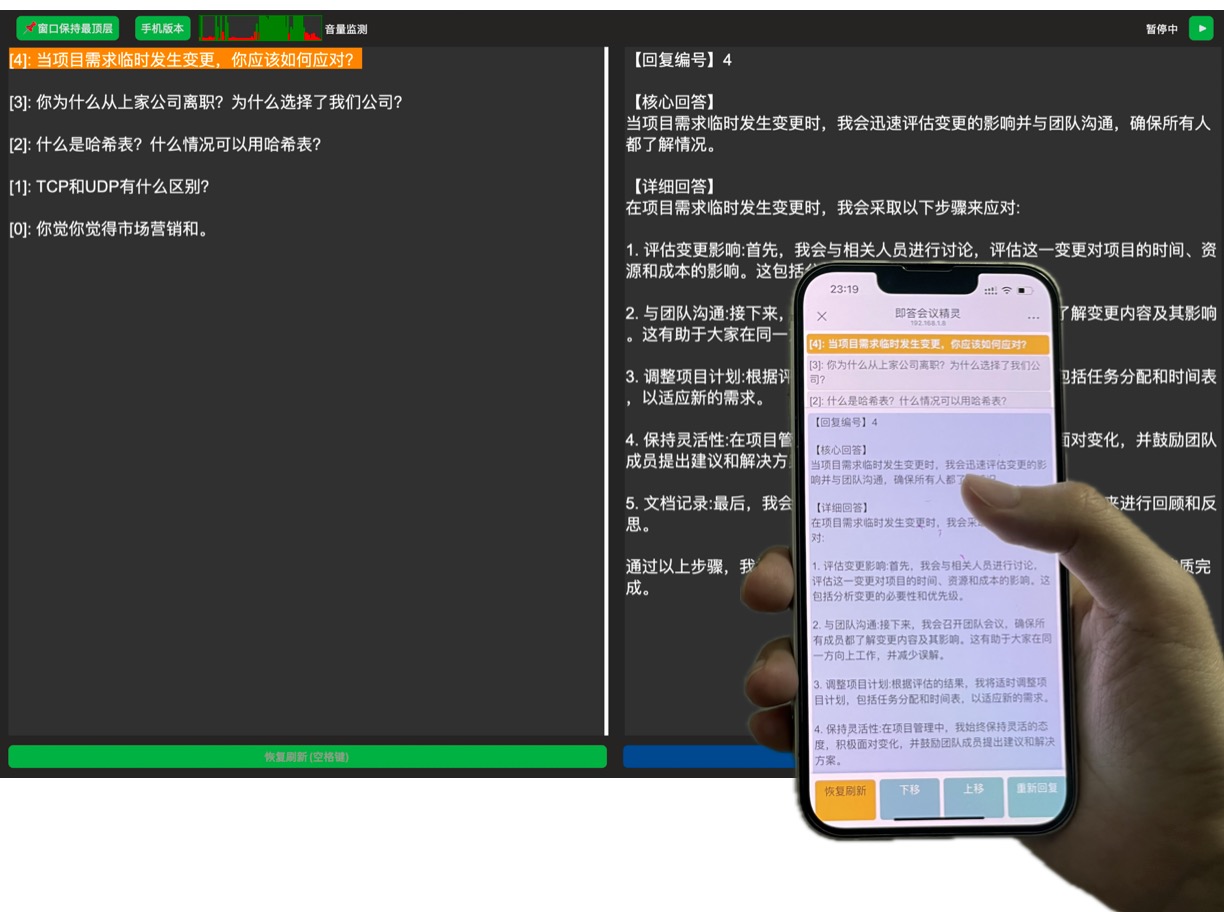
Mobile Control Interface
6. Customer Support
Thank you for choosing our product, we wish you a pleasant experience!


