User Documentation: Meeting Genie for MacOS
directory
1. Product Introduction
An assistant software designed for professional occasions that recognizes the user's microphone/speaker speech in real time and converts it into a transcript; And automatically generate responses through the GPT model for efficient communication.
Product Effect
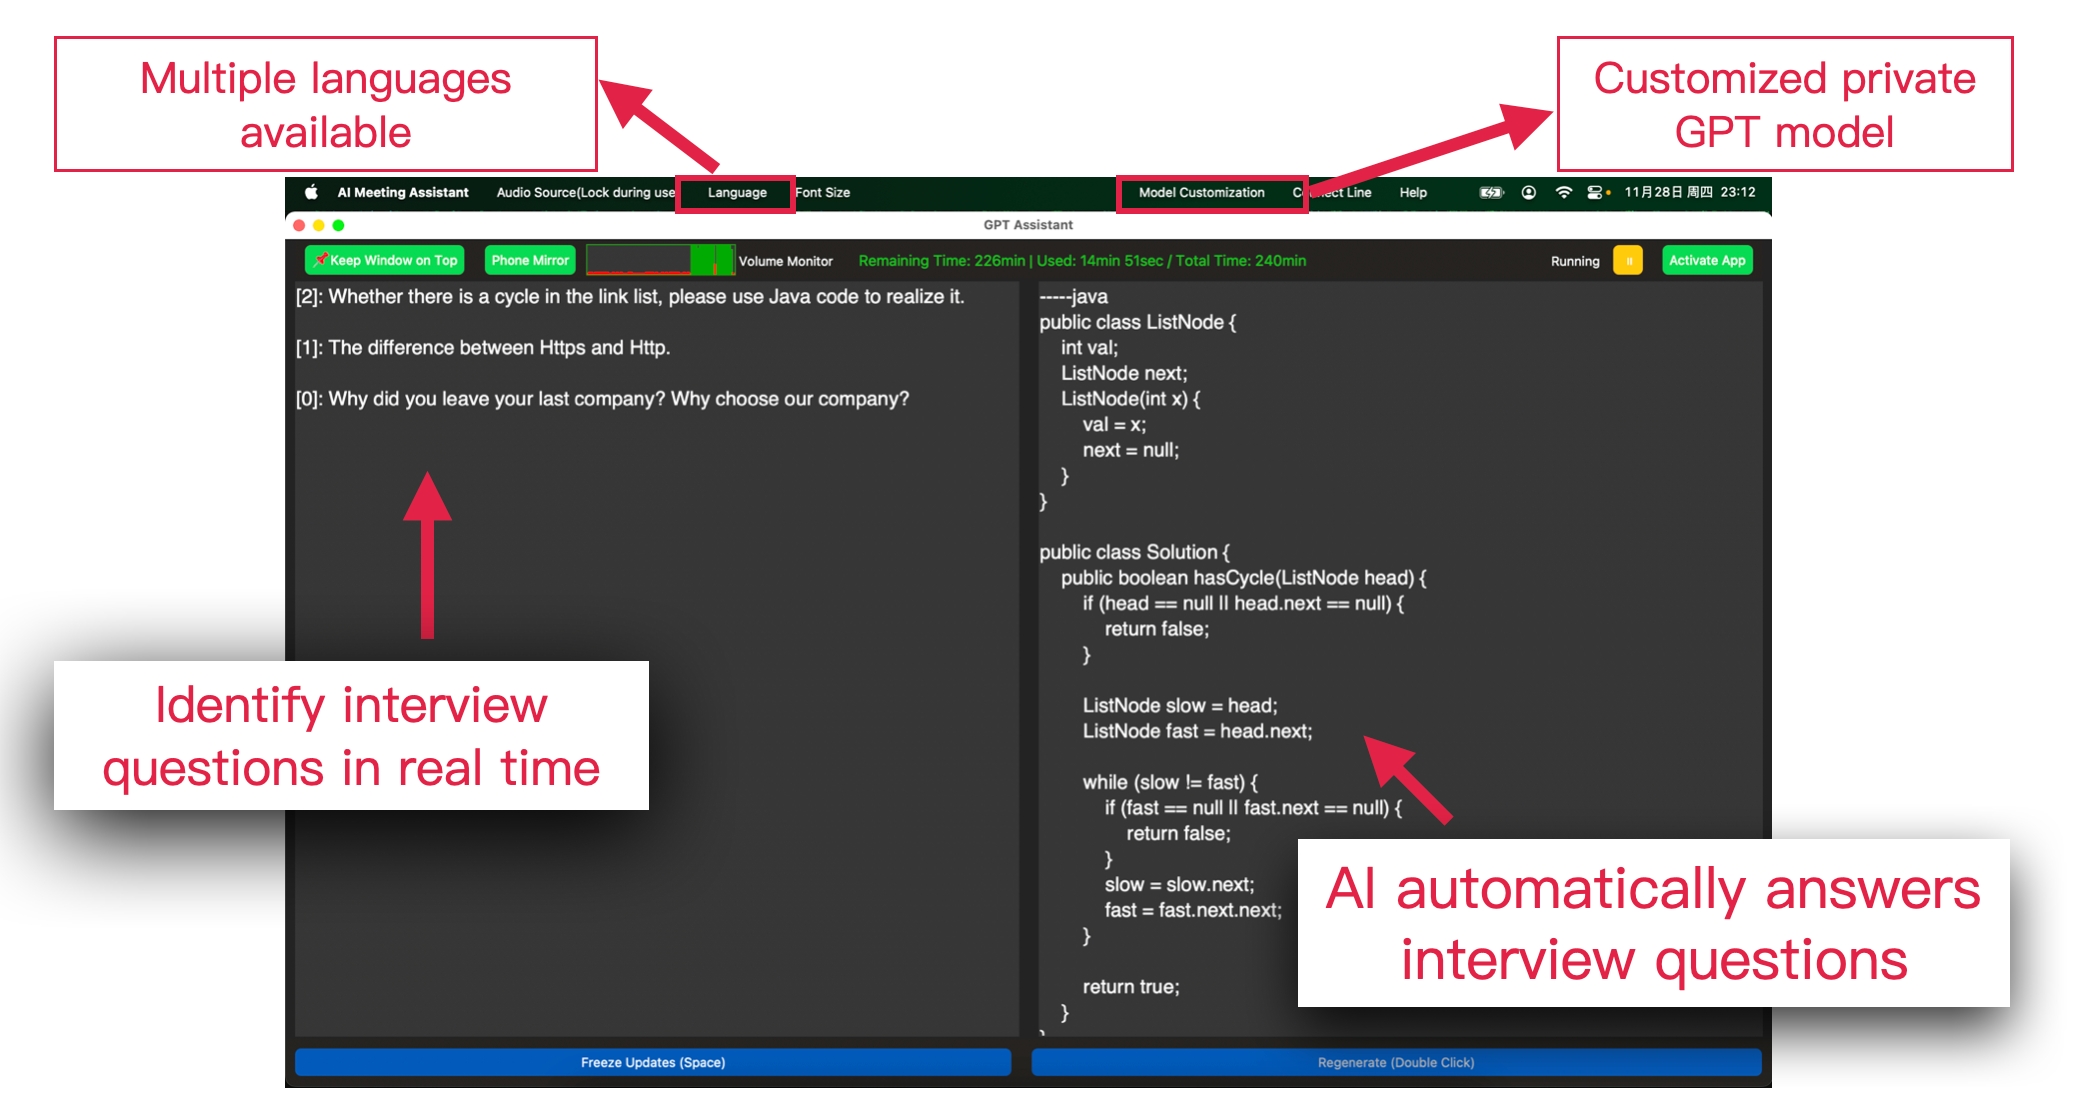
>
3. Navigation of the interface
3.2 Main interface layout
3.2.1 Left area: Real-time voice transcription
Real-time speech display area: Displays speech-to-text content captured in real time.
Numeric label: The numerical number of the current statement identified by "[number]" before each transcription.
3.2.2 Right area: Intelligent GPT assistance
Smart Assist: Automatically identify key information in the transcript and generate smart assisted responses.
Historical Replay: Provides a secondary replay of historical conversations, allowing users to accurately review what was discussed.
3.2.3 Bottom area: Status Action Bar
Frozen/Resume Refresh Button: Froze/resume dialog interface refresh
Reply button: Regenerate the reply to the current conversation
3.3 Description of the status of the interface
While the application is running, the conversational interface will switch between the following two states based on the user's interaction behavior:
1. Frozen state:
When a user pulls down the conversation history to view old transcripts, clicks or double-clicks the historical conversation, or clicks the "Freeze Refresh" button, the conversation interface will enter a frozen state.
In the frozen state, the dialog interface will stop automatically refreshing, so that users can check historical information without being disturbed by new messages.
2. Refresh state:
In the frozen state, users can exit the frozen state by clicking the "Resume Refresh" button or by pulling the conversation history to the very top.
Once back in operation, the conversational interface will resume real-time updates, instantly displaying the latest voice transcripts and GPT responses, ensuring that users don't miss any new interactions.
4. Feature Usage Guide
4.1 Start/Stop Buttons
In the top right corner of the app's interface, you'll see a distinct "Start" button. Tap this button and the app will start recognizing your voice input in real-time, converting it into text, and generating a response using the GPT model. Clicking the button again will pause the recognition function.

Start/Pause
4.2 Operational Gesture Guide
Click Historical Conversations: Click a record in the History Conversation column, and the corresponding historical replies to the historical conversation will be displayed on the right. The dialog interface will enter a frozen state, and the automatic refresh will be paused.
Double-click on the historical chat history: If the answer does not meet your expectations, double-click the relevant conversation history to regenerate the GPT reply. The dialog interface will enter a frozen state, and the automatic refresh will be paused.
Swipe down on the history of the conversation: When you swipe to view the conversation history, the conversation interface will enter the frozen state and pause the automatic refresh.
Swipe up to the top of the conversation: When you scroll to the top of the conversation, the conversation interface will exit the frozen state, and the recovery page will automatically refresh to display the latest real-time conversations and replies.
Click the Freeze Refresh Button/Spacebar: Click the Freeze Refresh button, or press the Spacebar, the dialog interface will enter the frozen state and pause the automatic refresh.
Click the Resume Refresh button/Space bar: Click the Resume Refresh button, or press the Space bar, the dialog interface will exit the frozen state, and the recovery page will automatically refresh to display the latest real-time conversations and replies.
Click the Reply button: In the frozen state, you can manually regenerate the GPT reply to the conversation.

Operation Gesture Guide
4.3 Voice Input Devices
4.3.1 Microphone voice input
4.3.1.1 Microphone Access Authorization
When using a microphone for voice input, keep the following in mind:
Permission Authorization: When you first open the app, macOS will request permission to access the microphone. Make sure to grant permission so that the app can capture speech properly.
Manual Permission Authorization: If you have previously denied microphone access, you can re-authorize it by following these steps:
Open System Preferences.
Click on "Security & Privacy".
Under the "Privacy" tab, select "Microphone".
Find and tick the name of the app to allow it to access the microphone.
Restart the app to gain microphone access
Make sure that the microphone is working properly and has been correctly recognized by the system.
To ensure the best speech recognition, use the microphone in a quiet environment.
When you enable the microphone as a voice input device, and the speaker is in the external state, the microphone may capture both the sound from the speaker and the user's voice, so please adjust it to avoid interference.
4.3.1.2 Microphone speech recognition is abnormal
If you encounter inaccurate microphone speech recognition, missing words, or sentence interruptions, it is recommended to check the following three aspects:
1. Observe the volume detection shown in the figure below to see if the volume has reached the highest
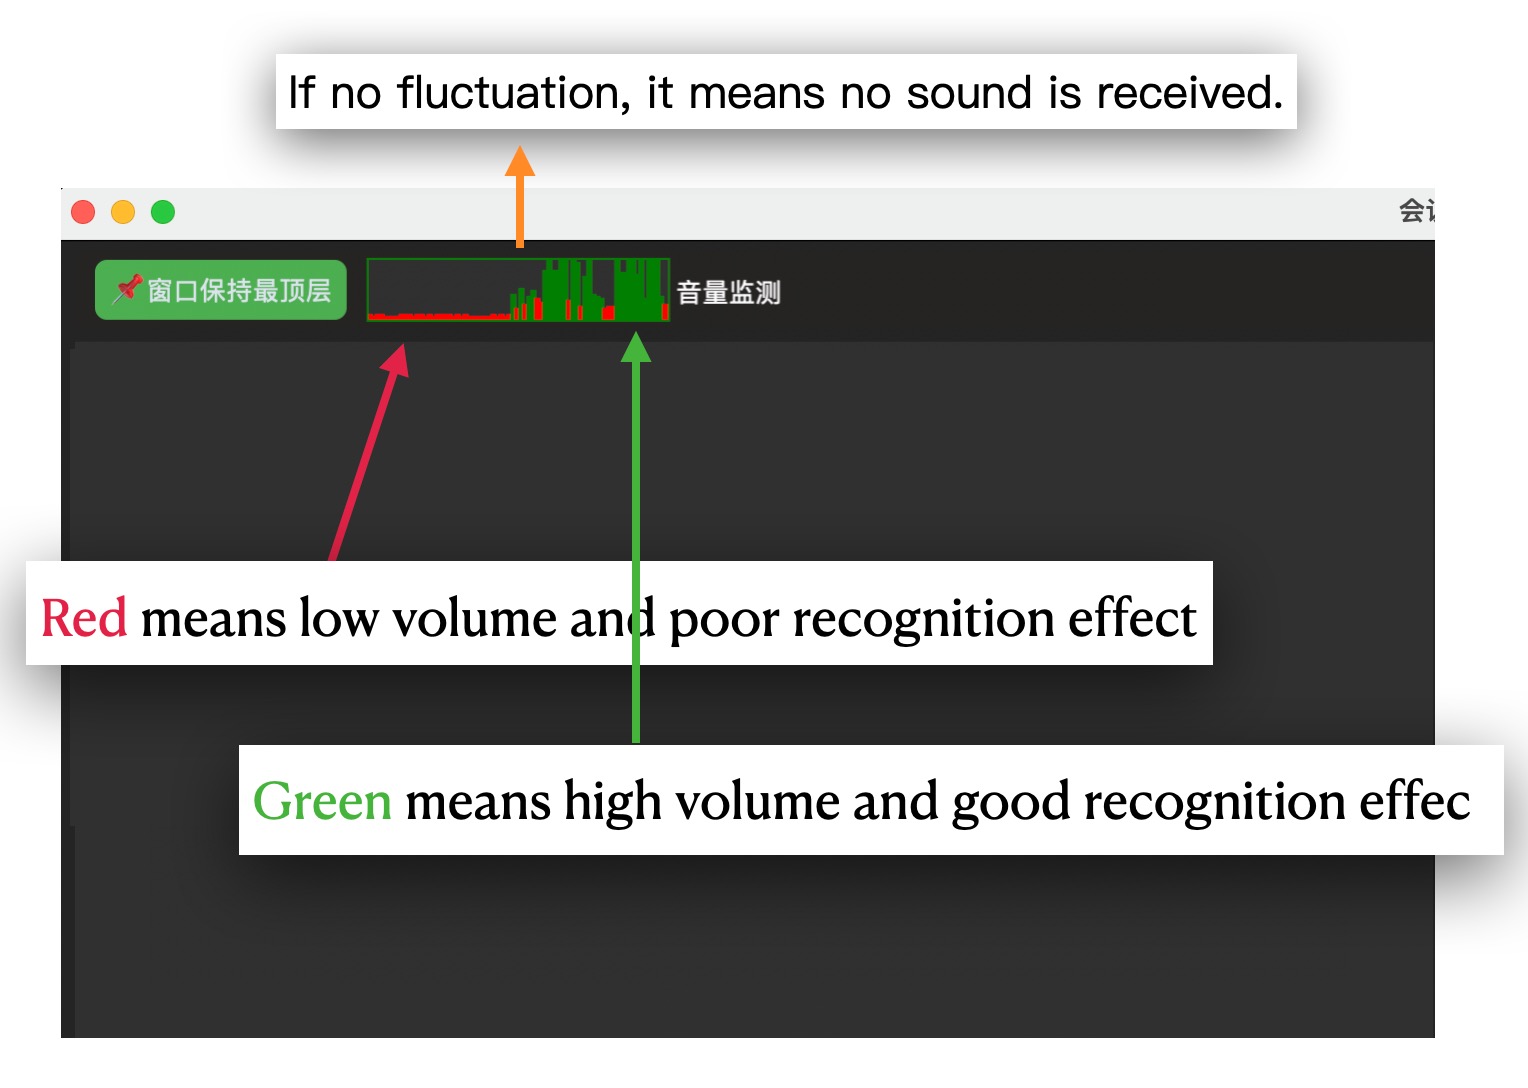
Observe whether the volume size meets expectations
2. If the volume does not reach the highest level, we recommend that you take the following measures to optimize the microphone settings by referring to the figure below:
Check and adjust the input volume of the microphone to make sure it is set at the appropriate level.
If your microphone supports ambient noise suppression, try turning it off to see if it improves recognition accuracy.
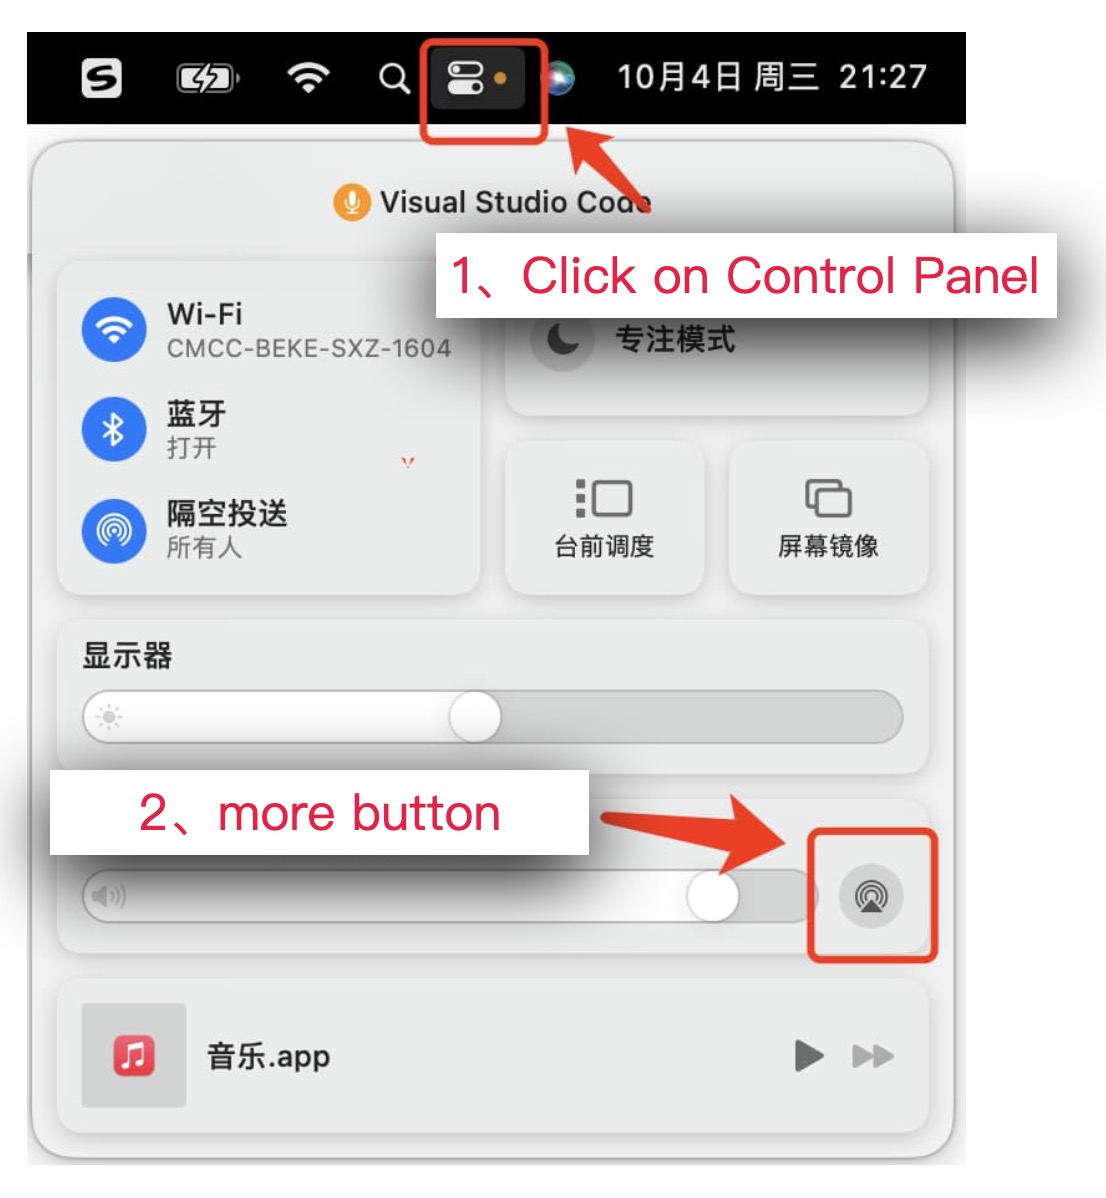
1. Open the panel
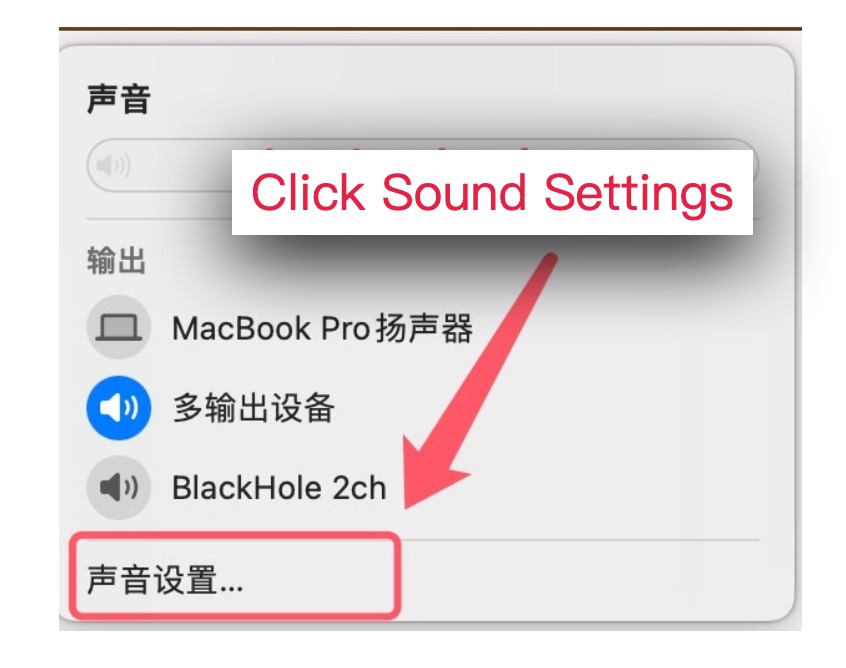
2. Open the sound settings
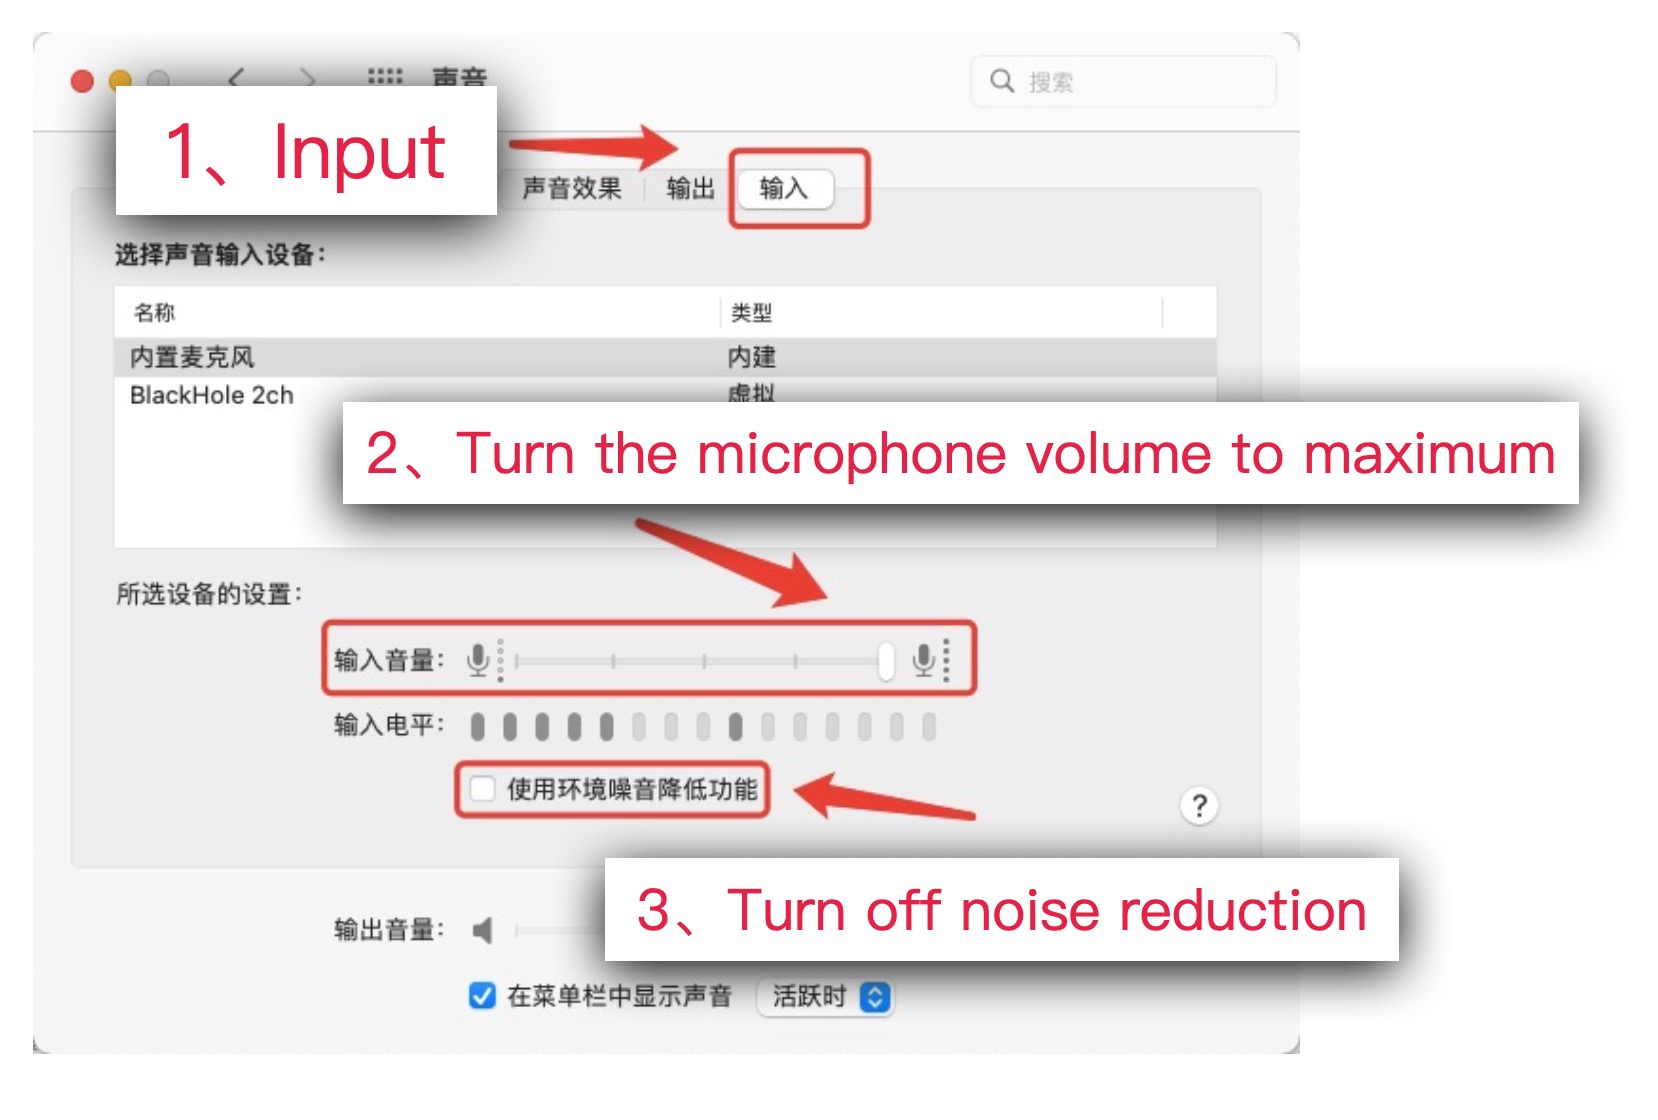
3. Adjust the input microphone volume and turn off the ambient noise function
4.3.2 Speaker voice input
For macOS users, if you want to capture sound from your speakers, we recommend using BlackHole. It is a virtual audio driver for macOS that can route audio from one app to another.
BlackHole Installation & Configuration:
Download the BlackHole installation file: download link
( Alternate download link )
Once downloaded, double-click on the pkg file and follow the installation prompts to complete the installation.
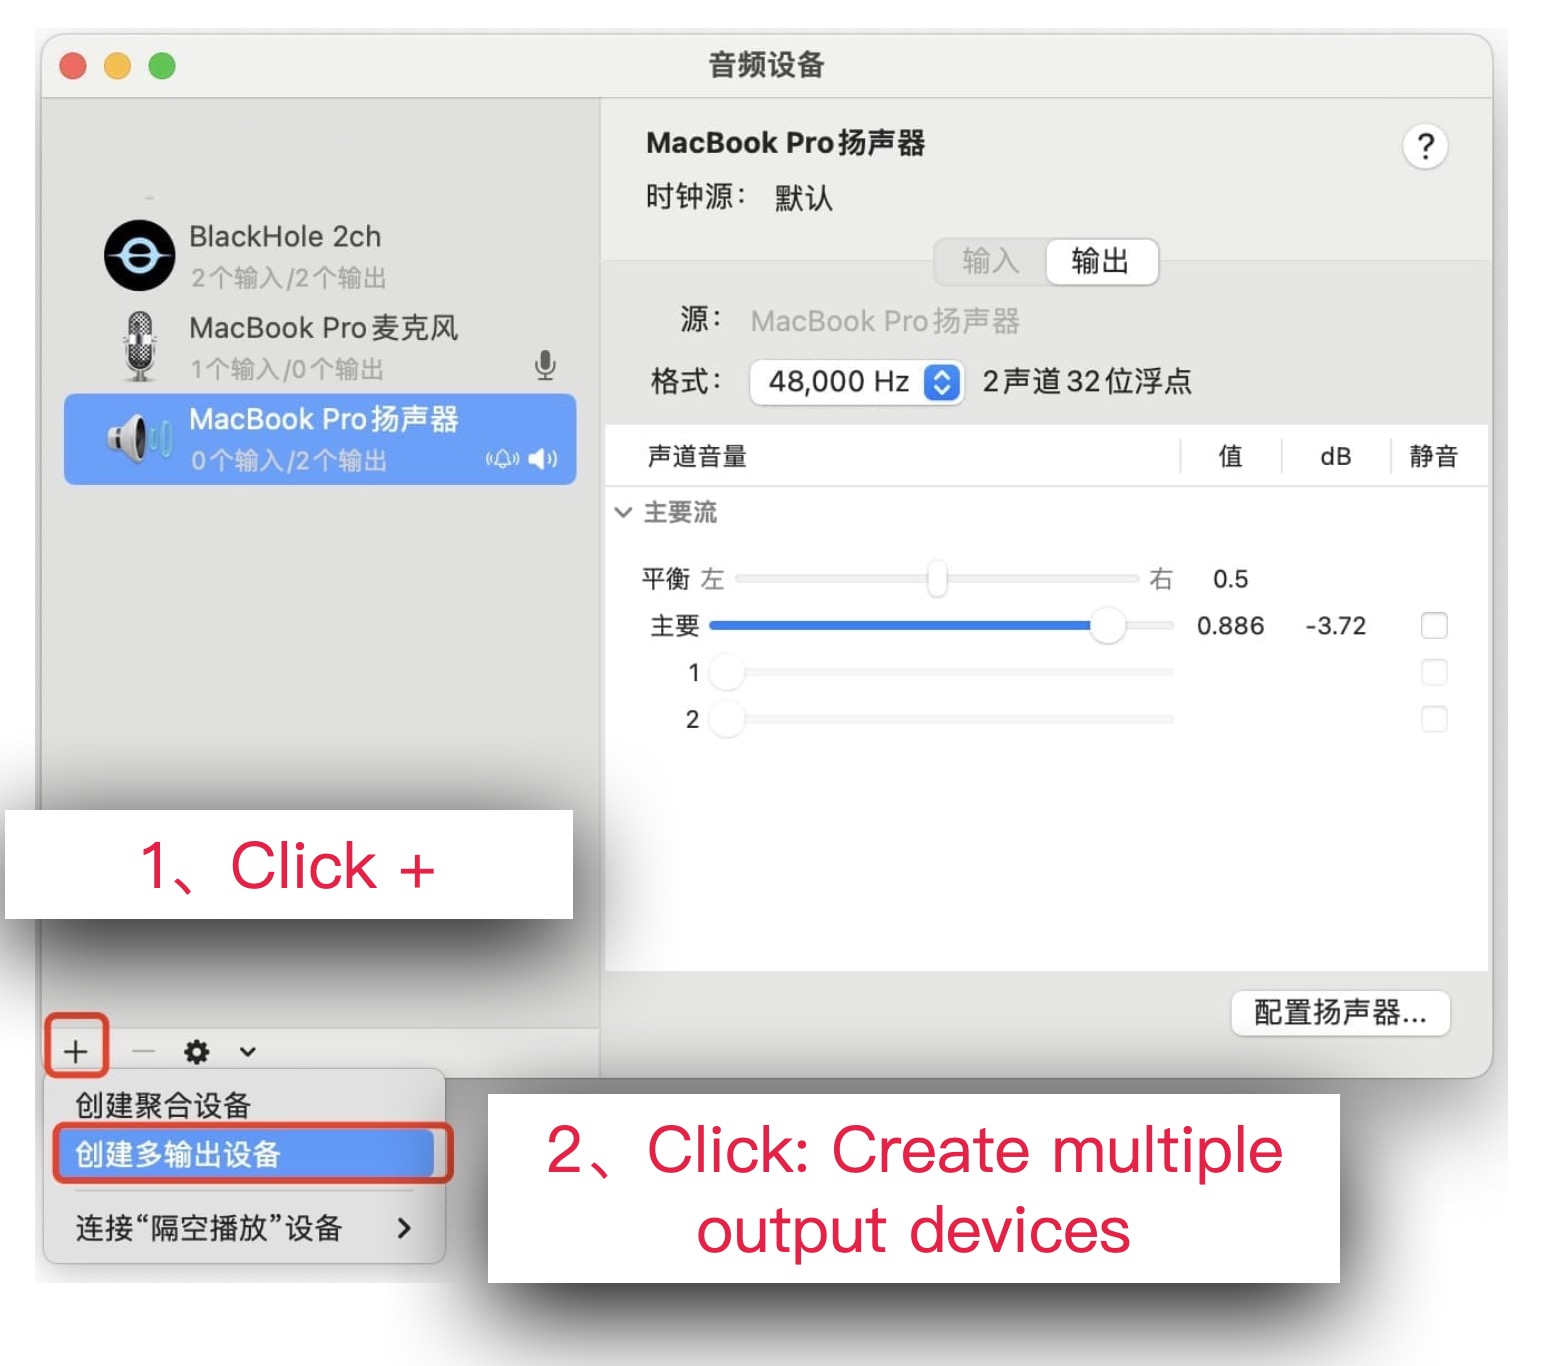
Follow the steps below to add a new multi-output device in Audio MIDI Settings and select BlackHole and your speakers (or other output devices such as headphones).
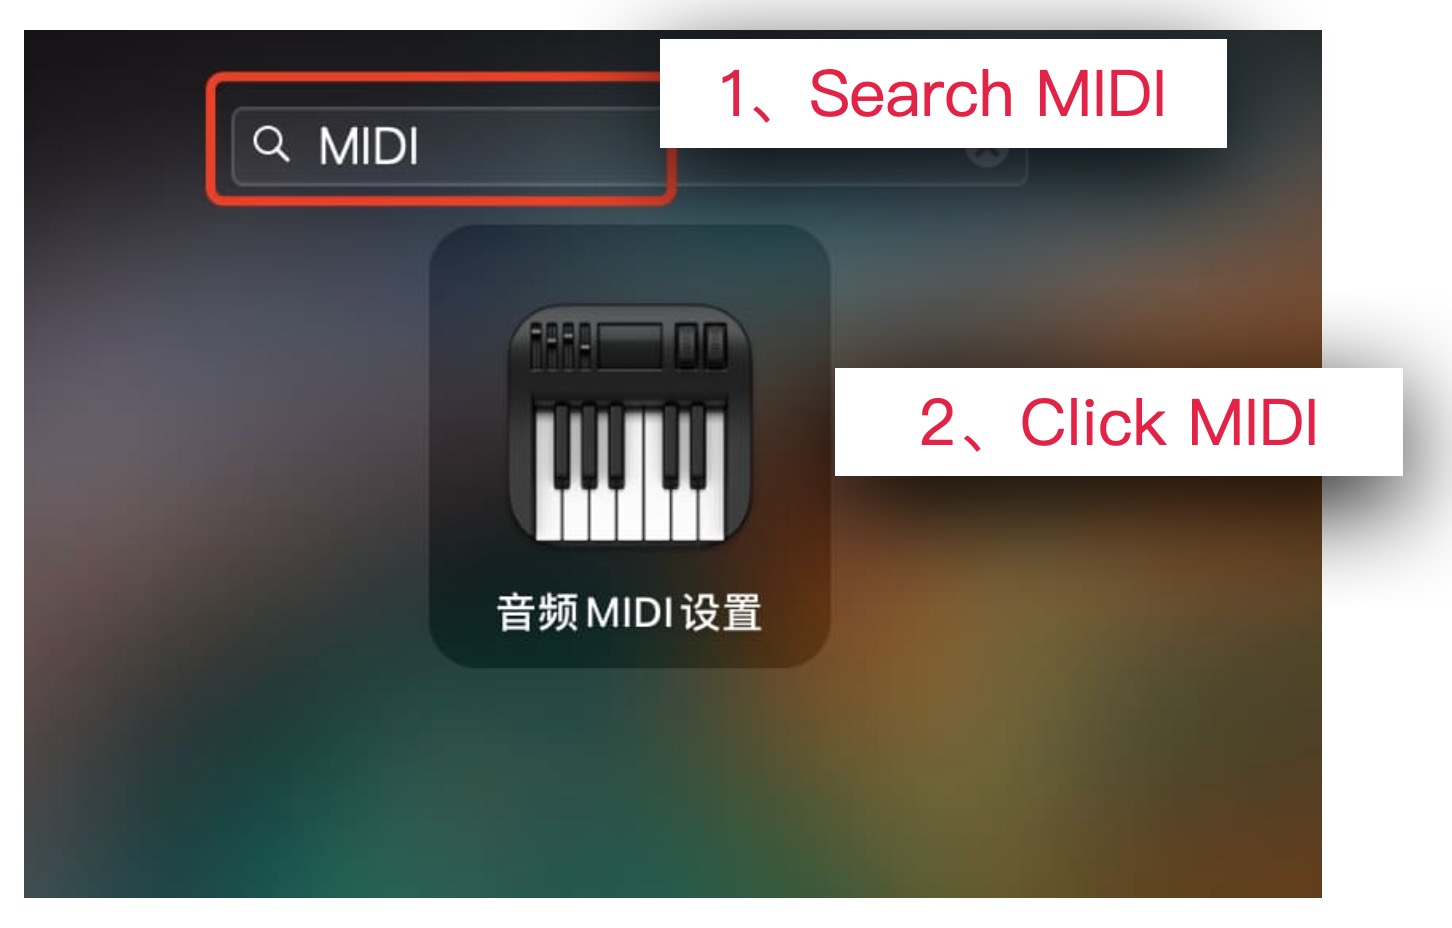
Open "Audio MIDI Settings", which can usually be found in your app or system settings.
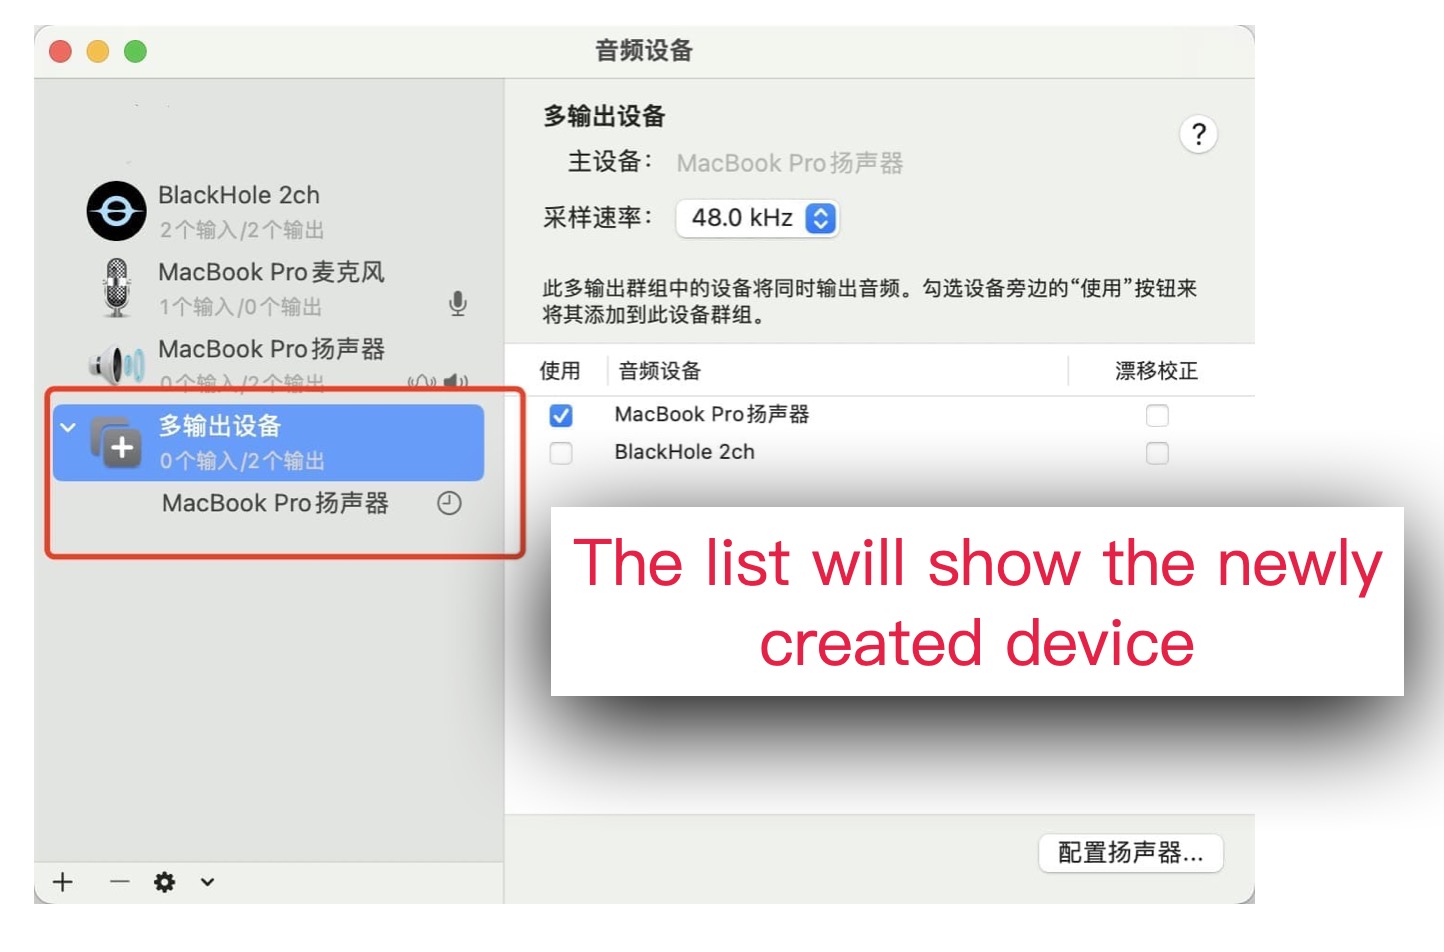
Add a new multi-output device
In the configuration options, you can choose between the BlackHole and the speaker device, so that the multi-output device is equivalent to the speaker, and the "multi-output device" can output audio to both the speaker and the interview GPT software.
Alternatively, you can choose BlackHole and an external headphone device, so that the multi-output device is equivalent to an external headset, and the "multi-output device" can output audio to both the external headset and the interview GPT software.
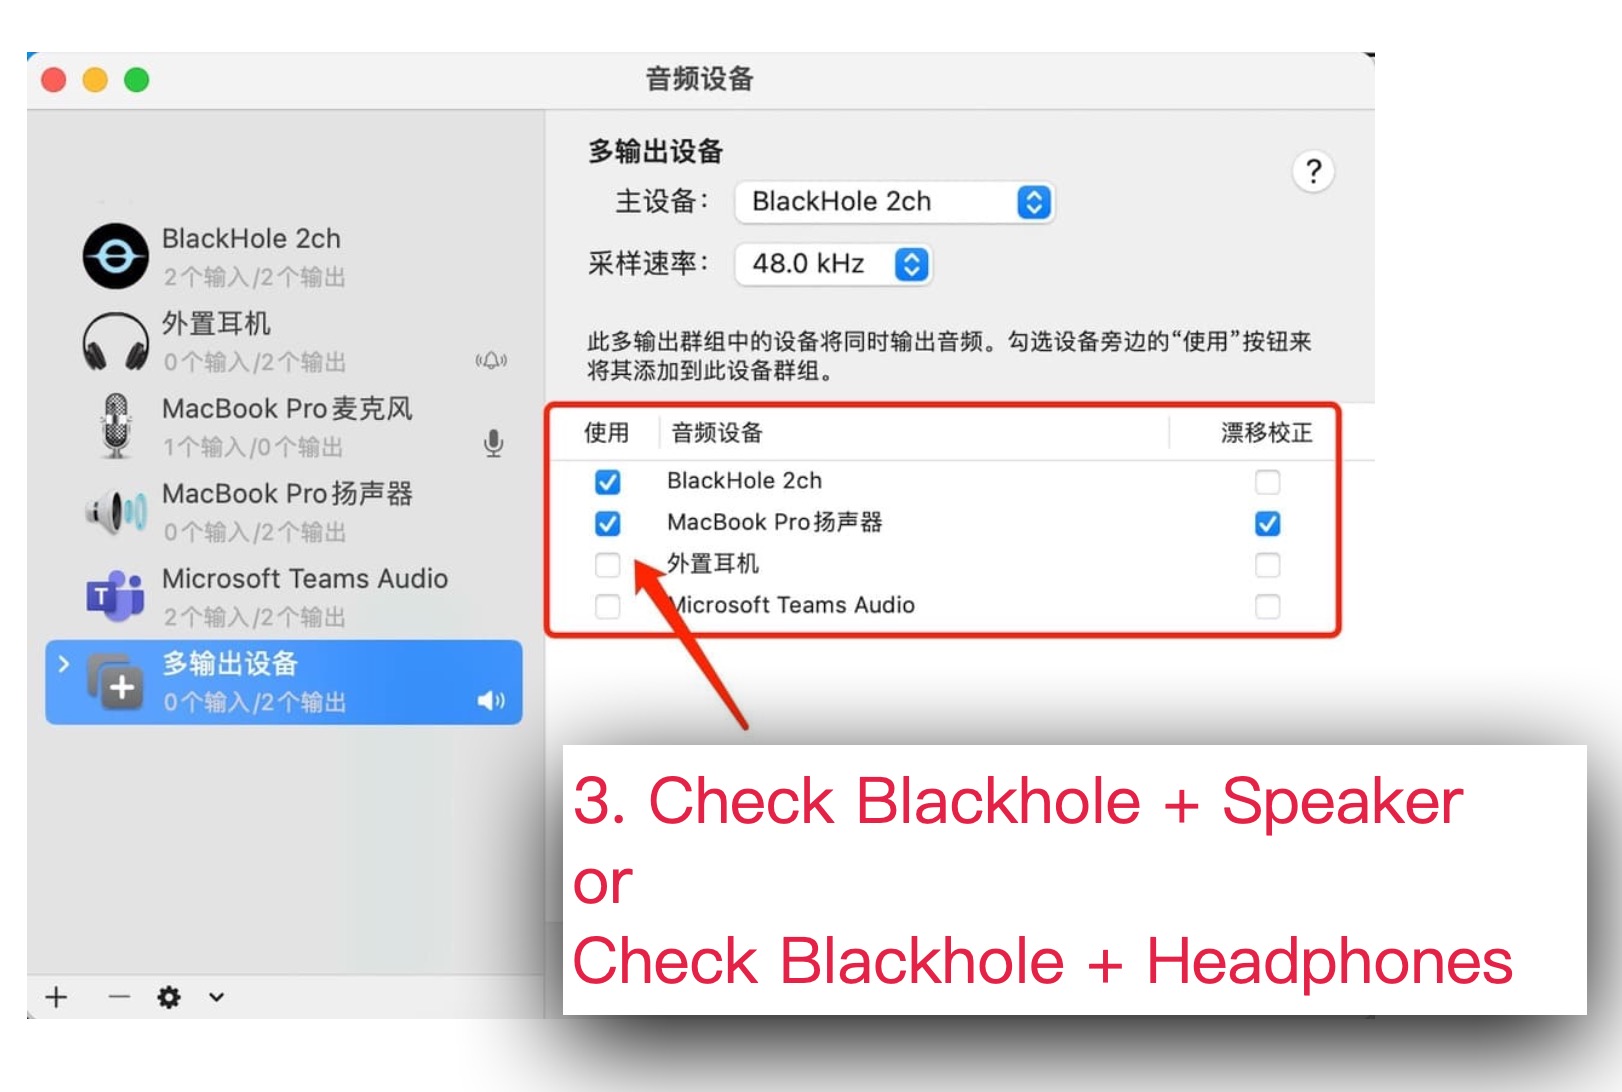
Step 4: Tick Speaker/Headphones + BlackHole
Adjust the Blackhole output volume to the maximum
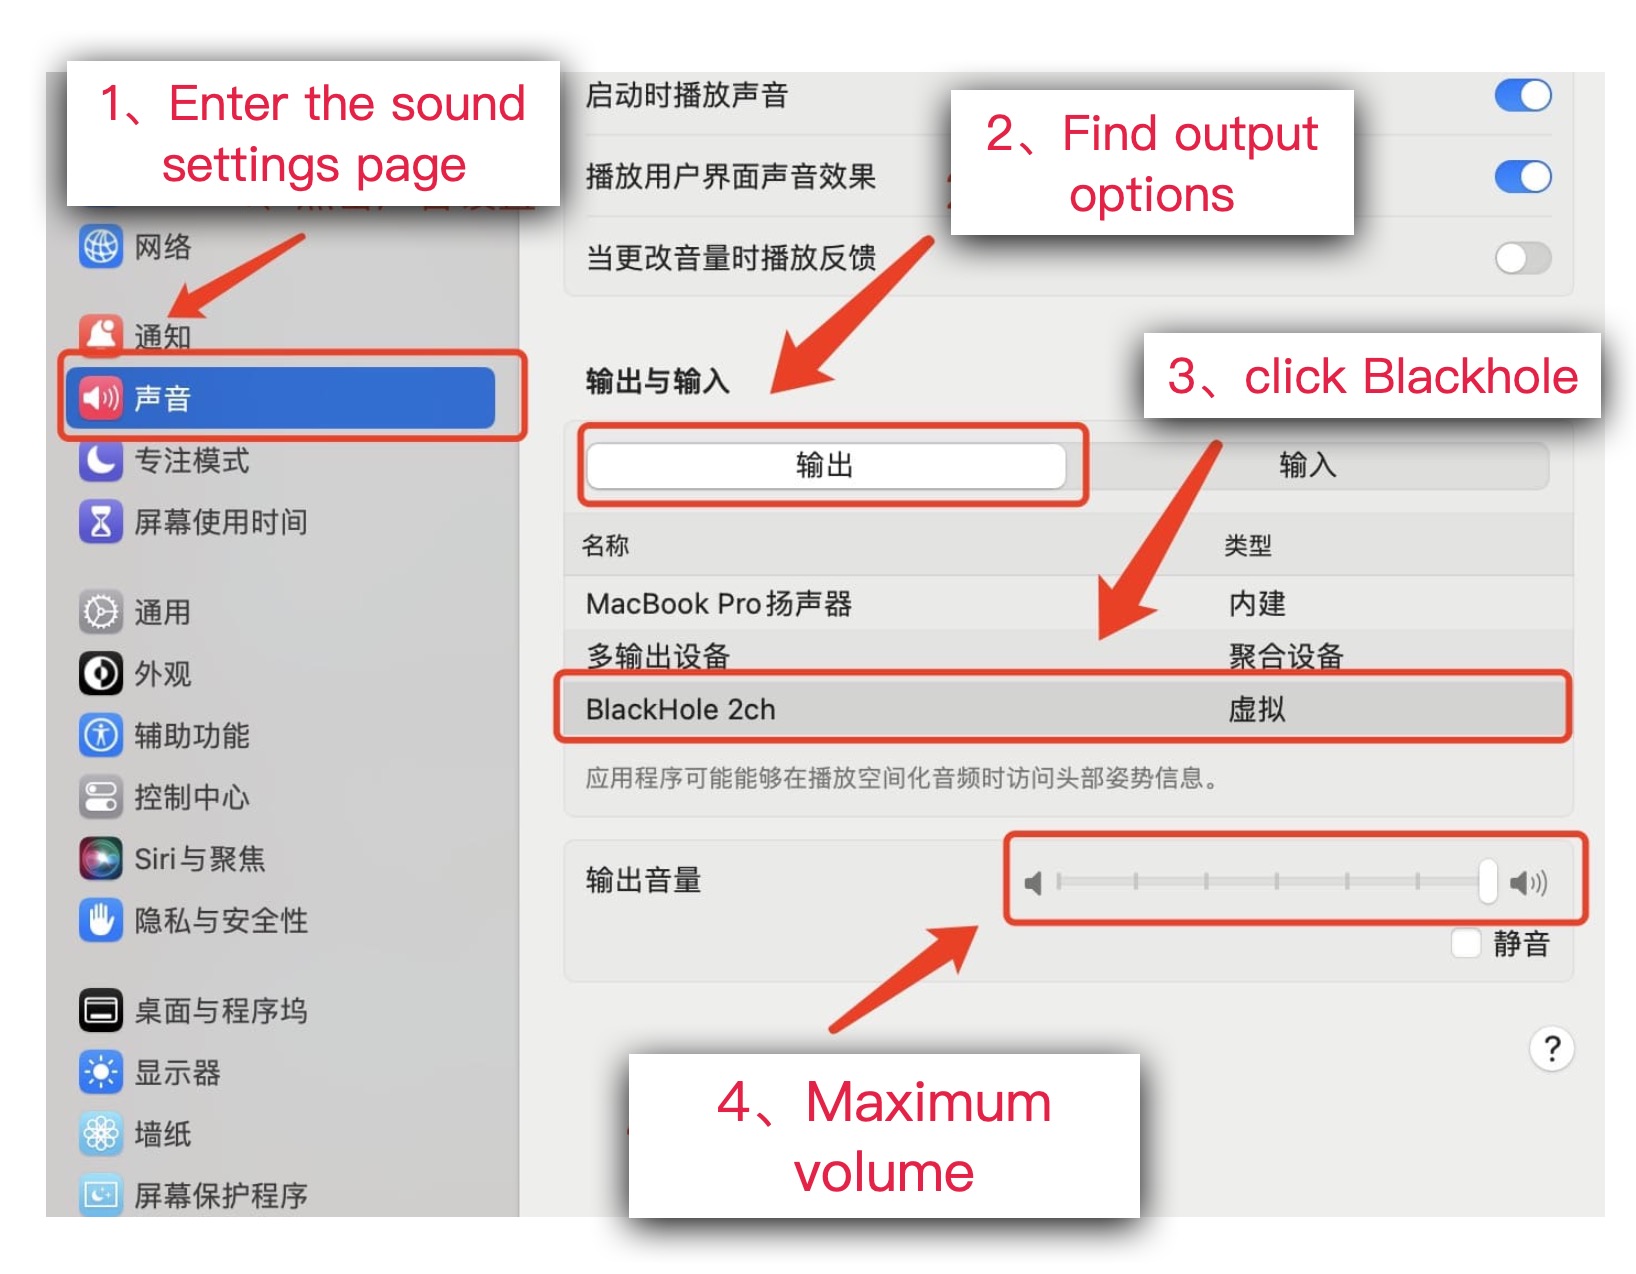
Adjust the Blackhole output volume to the maximum
Set your system sound output to a newly created multi-output device.
It should be noted that after selecting "Multi-Output Device", the output volume cannot be adjusted. Therefore, it is recommended that you adjust the volume of your speakers/headphones before choosing.

Step 1
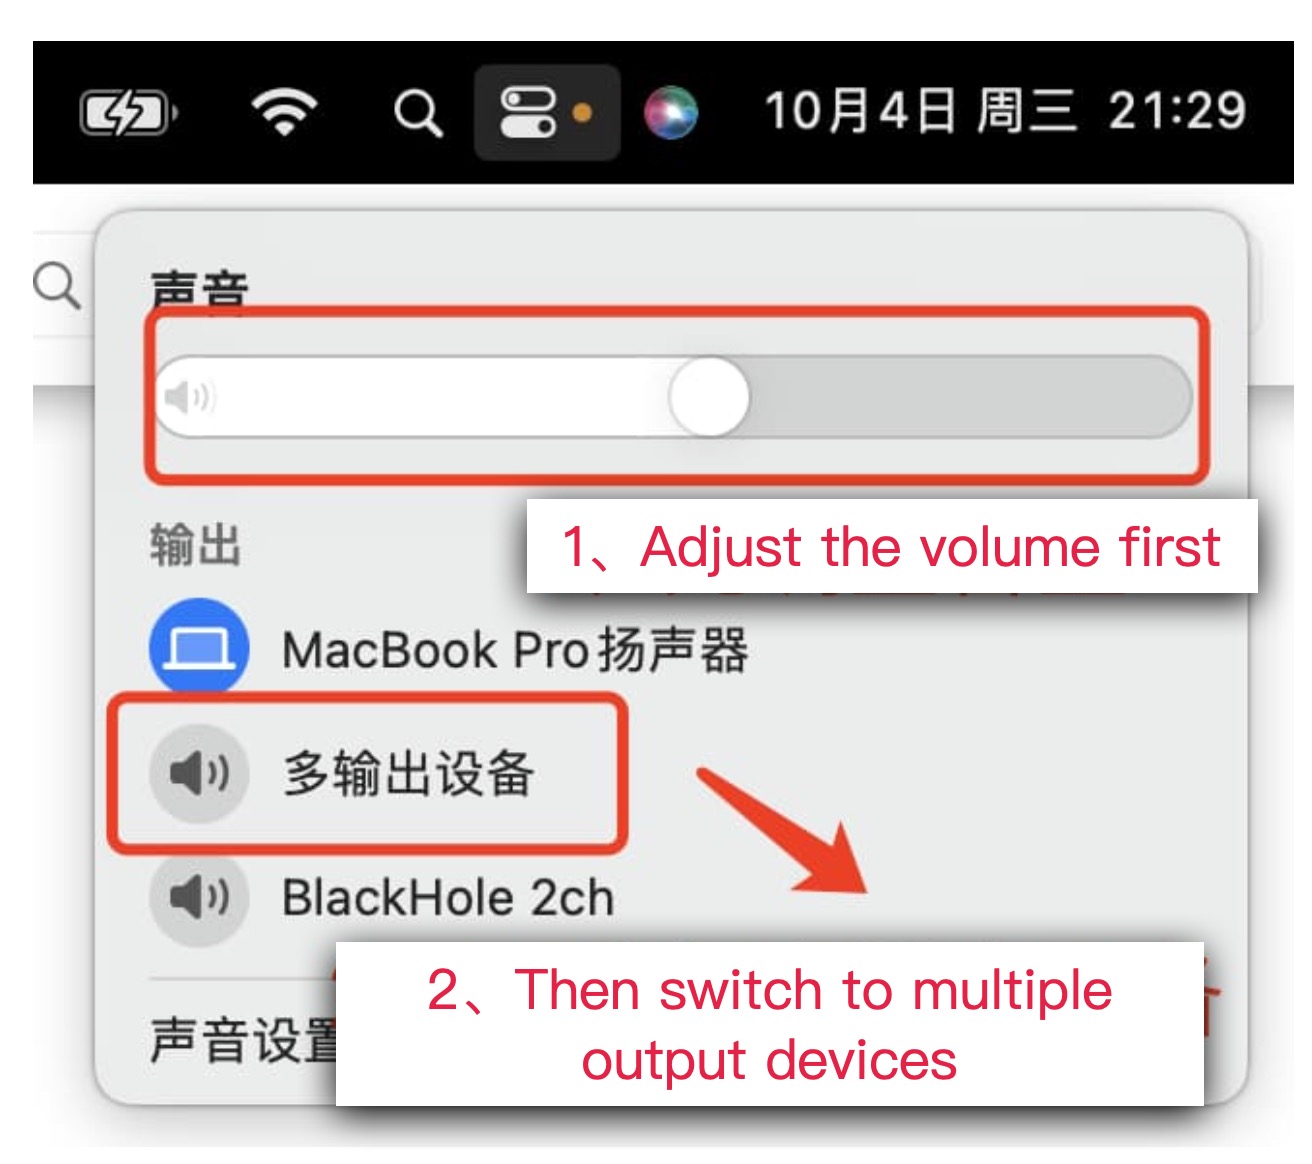
Step 2
You can now select your voice input device as "Speaker" in the app and still hear from your speakers/headphones.
Conference Video Software Configuration:
When using the conference video software, please follow the instructions below to adjust the speaker device settings in the meeting. Doing so ensures that the audio output of the meeting is effectively recognized by the application, ensuring a smooth, distraction-free meeting experience.
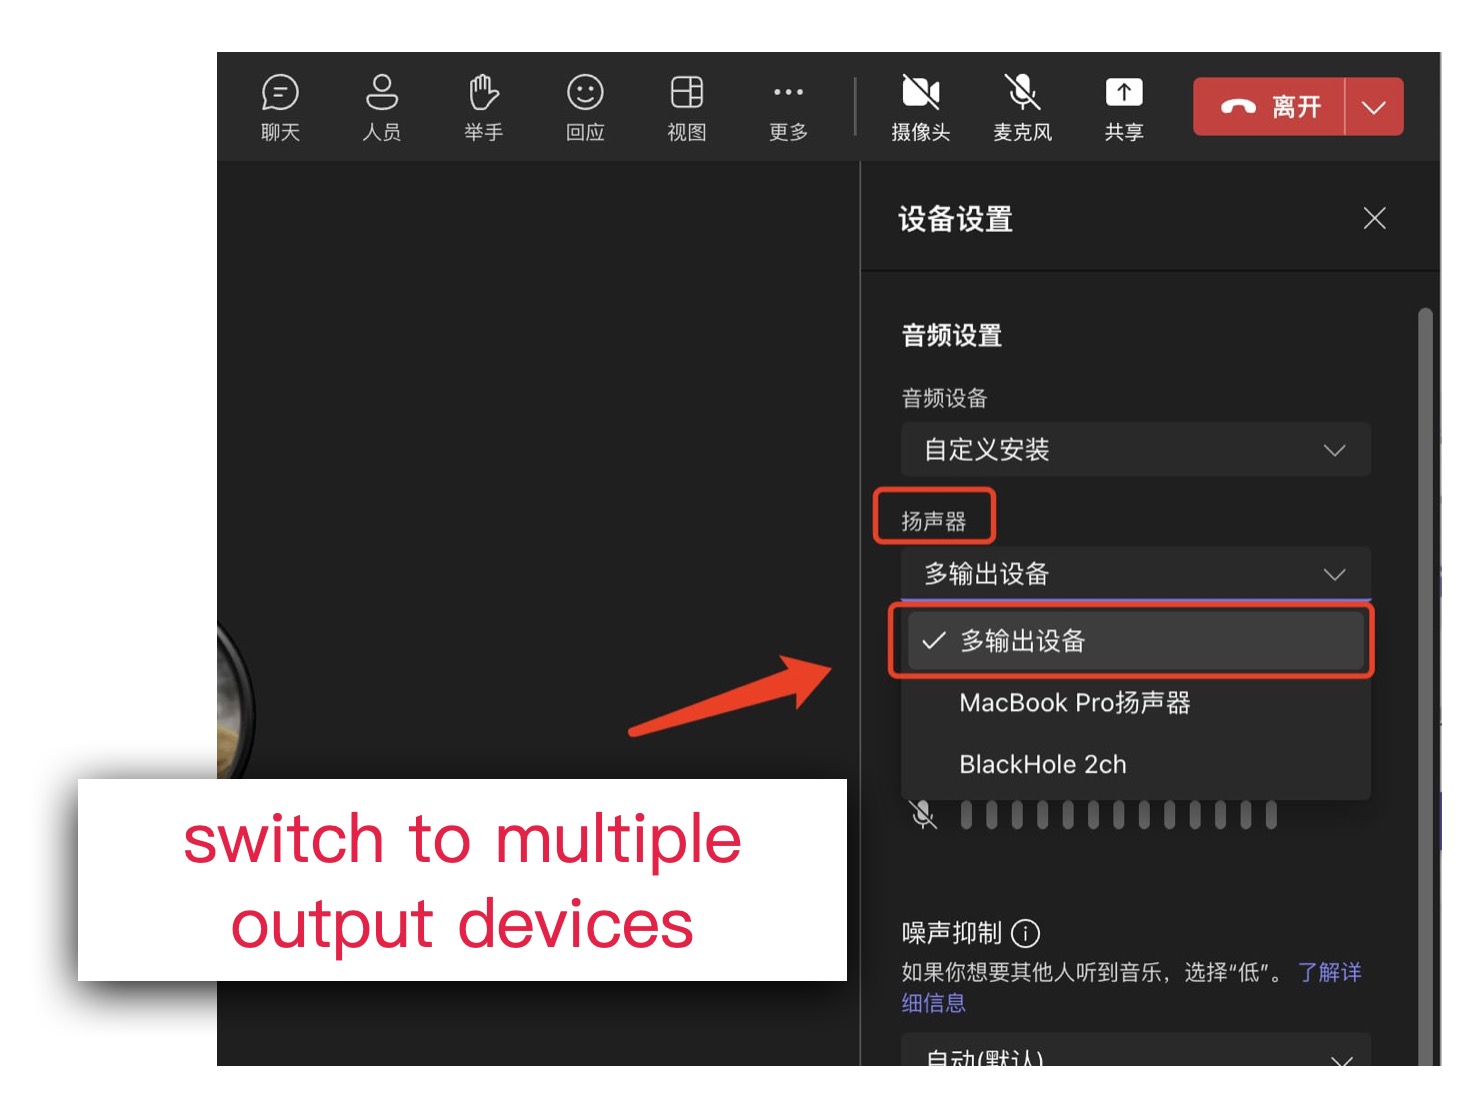
Microsoft Teams-2
You can now select your voice input device as "Speaker" in the app while still hearing the meeting sound from the speaker/headset.
4.4 Remote and quick control of mobile phone
Mobile phone remote quick control, which allows you to easily control the app from your mobile phone. You only need to scan the QR code on your mobile phone, open the web page, and you can see the operation interface of the desktop application on your mobile phone, and you can control the application.
4.4.1 Steps:
Please connect your phone and computer to the same WiFi network first.
Open the desktop app and tap the "Phone Controls" button in the top left corner. Use your mobile phone to scan the QR code, open the web page, and enter the mirror control interface.
Phone control can't start, click the View Solution: link
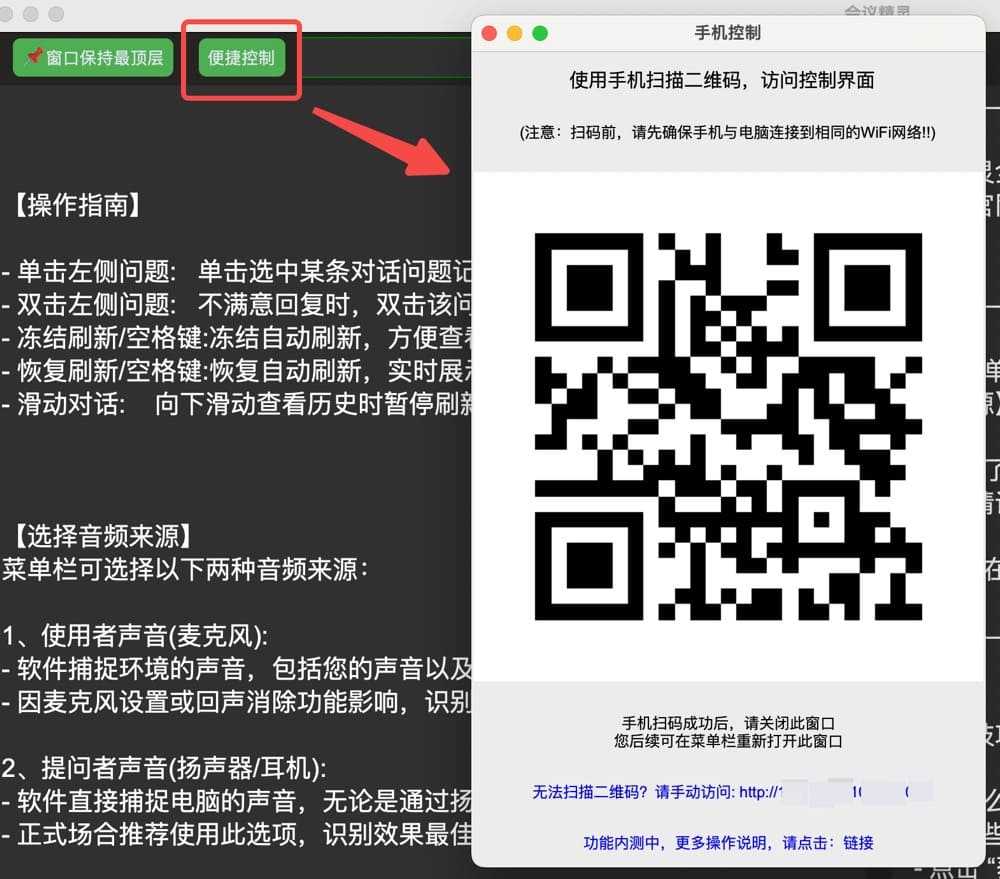
Control the QR code
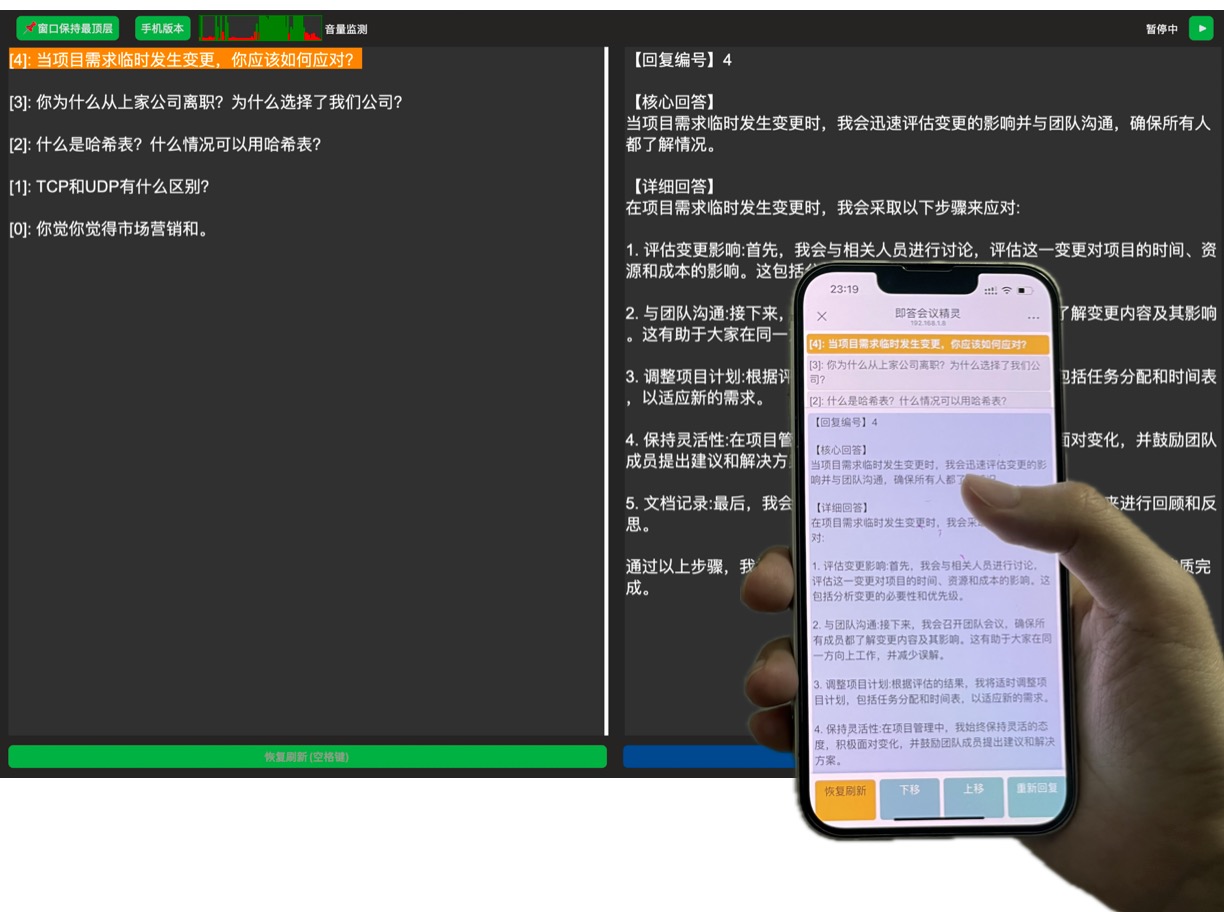
Mobile phone control interface
6. Customer Support
Thank you for choosing our product, we wish you a pleasant experience!


